Table of contents
No sections match your search. Try different keywords.
Introduction
BackTrackR is a live backing track player and show manager built for iPad. It is designed for musicians who perform with multitrack stems — separate audio files per instrument — and technicians who need to manage MIDI and timecode for multiple devices.
Think of it as a performance console for your show and backing tracks: import your songs, write or import a chart (lyrics and chords), build a cue list, mix each song, mark loops on the Timeline, set and manage your timecode and MIDI, arrange your on-screen controls, and play through the set with clear NOW and NEXT indicators.
BackTrackR is not a studio DAW and not a simple music player. It is built specifically for rehearsal, live performance, and show management.
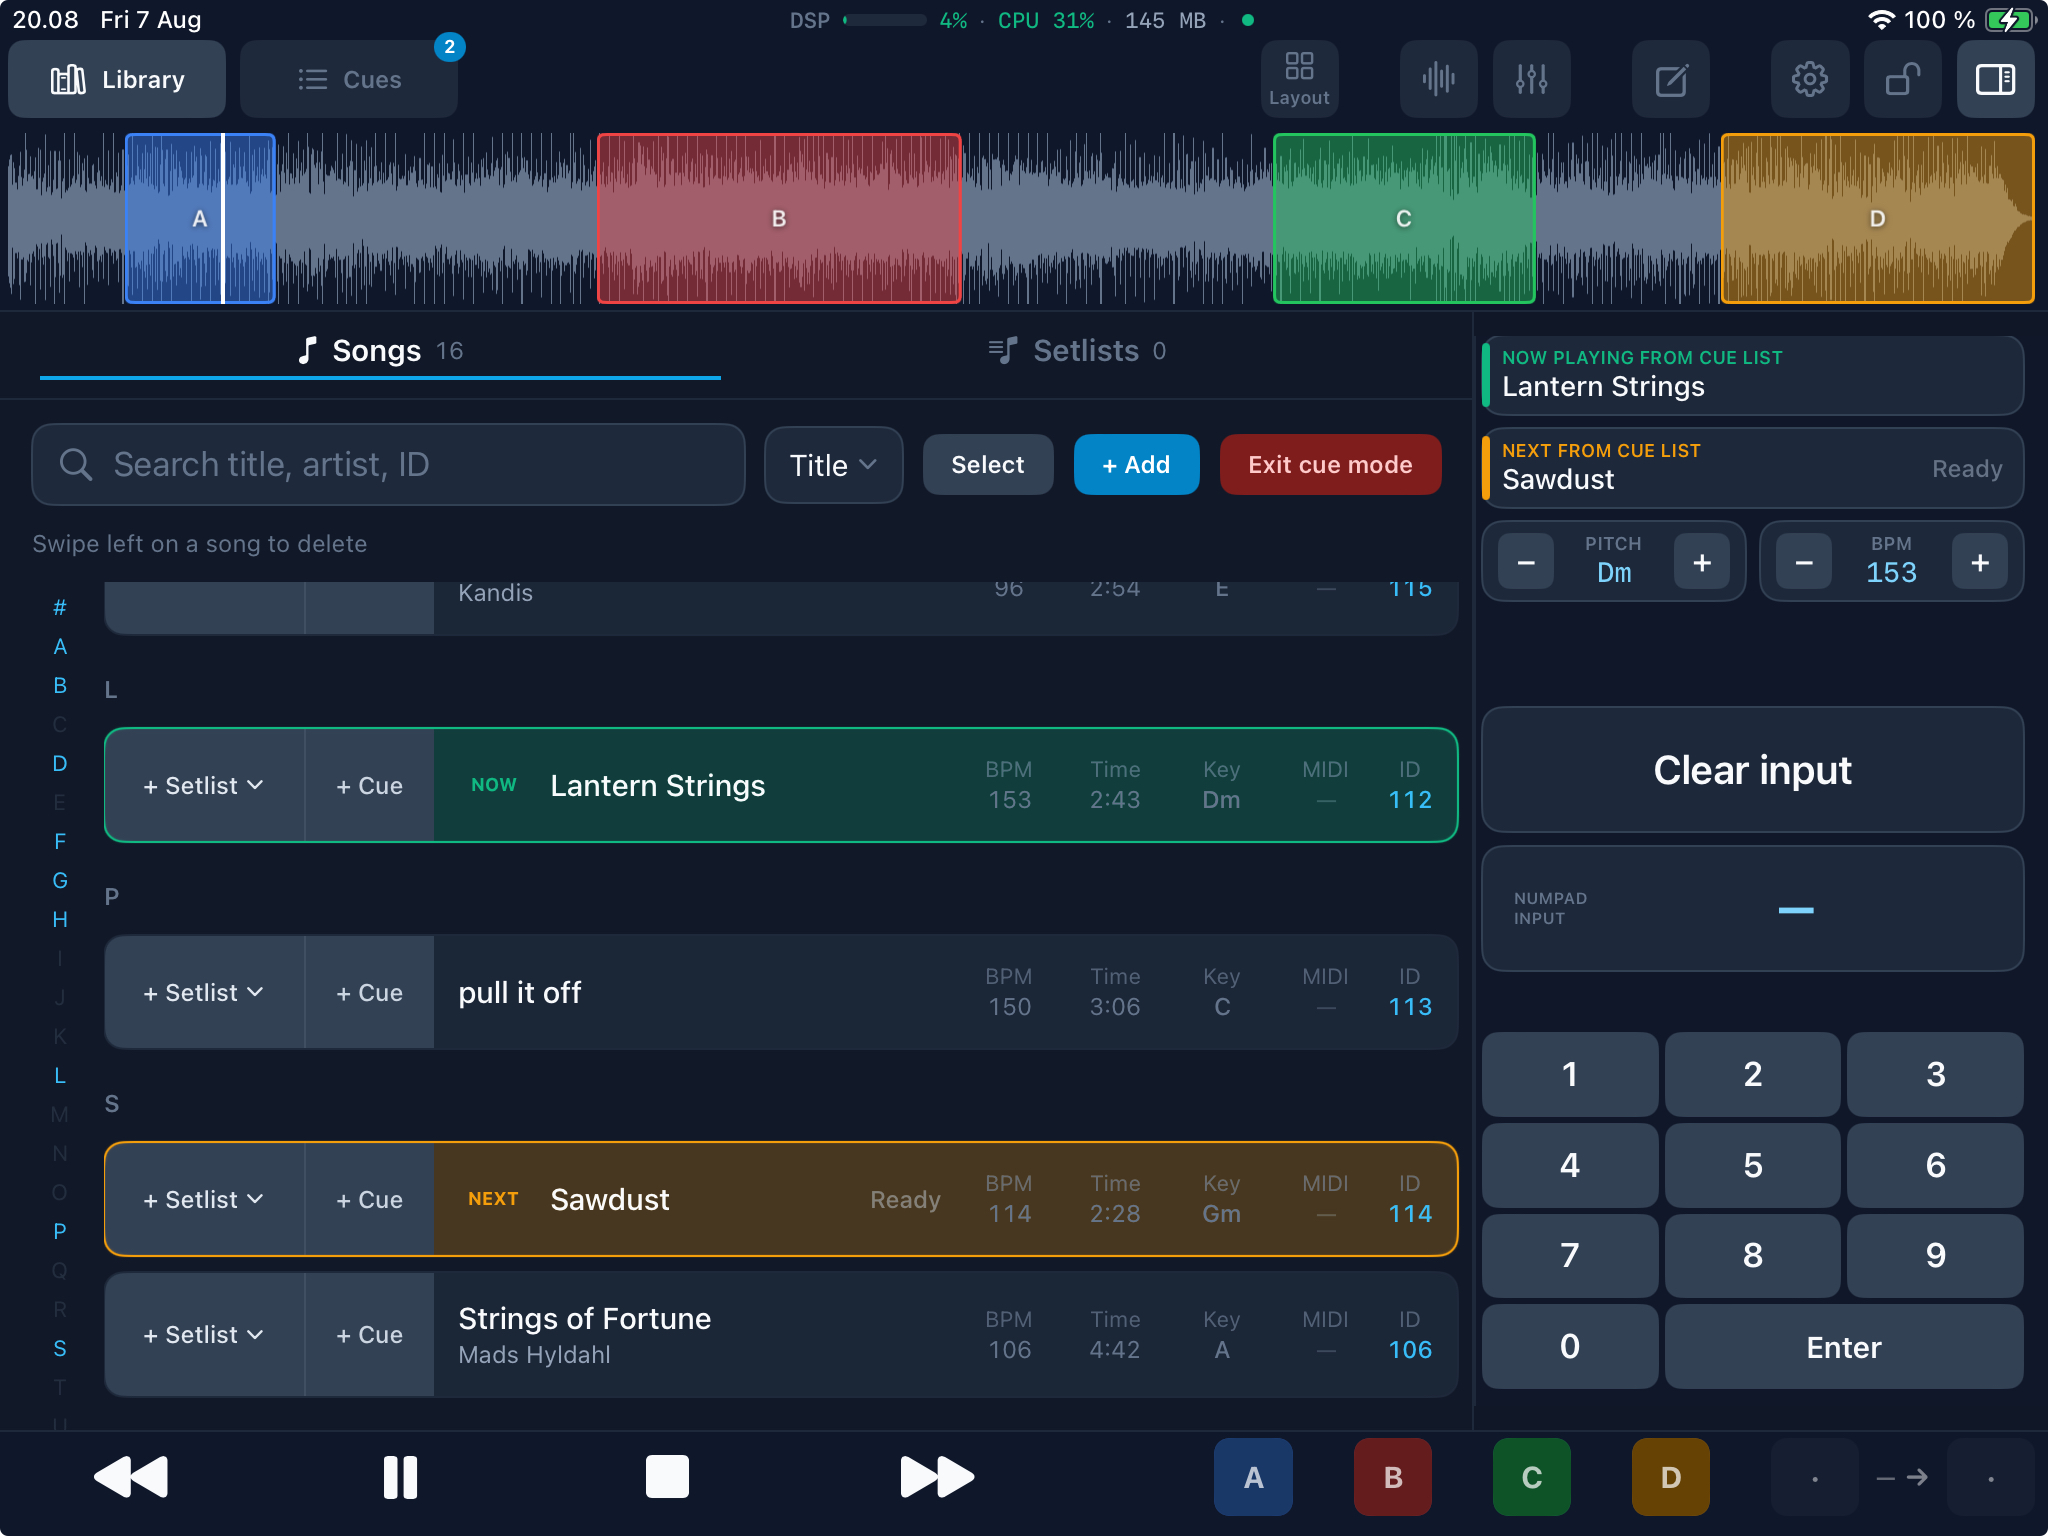
Workflow in three steps: Import songs → Build your cue list → Perform live.
System requirements
- Device: iPad only (not iPhone)
- OS: iPadOS 17+ / iOS 17+
- Orientation: Portrait and landscape — use whichever fits your rig and mount on stage
- Audio format: WAV, AIFF, MP3, M4A, AAC, CAF, and FLAC
- Storage: Songs and settings are stored locally on your iPad. Space needed depends on file format, number of tracks per song, and how many songs you keep.
- Audio interface: optional — the iPad’s built-in output is enough to start. A multichannel USB interface is recommended for live click / IEM / house routing. See Audio output.
No account is required. Cloud sign-in is only used if you choose to import or back up with your own Dropbox, OneDrive, Google Drive or Files / iCloud location.
First launch
When you open BackTrackR for the first time, your library is empty. There is no sign-up step — you can start importing songs immediately.
BackTrackR may offer Download demo song (~85 MB). That adds Demo Song 1 — stems, mix, chart, timeline markers and loops. Tap Download, or Not now and get it later from the library or Settings → Backup → Demo song.
- Open BackTrackR on your iPad.
- Go to the library and tap + Add + Add
 to add your first song bundle.
 - Open the song and tap Mix Mix
 to check levels on each stem.
 - Add the song to a cue list when you are ready to rehearse your set.
Understanding song bundles
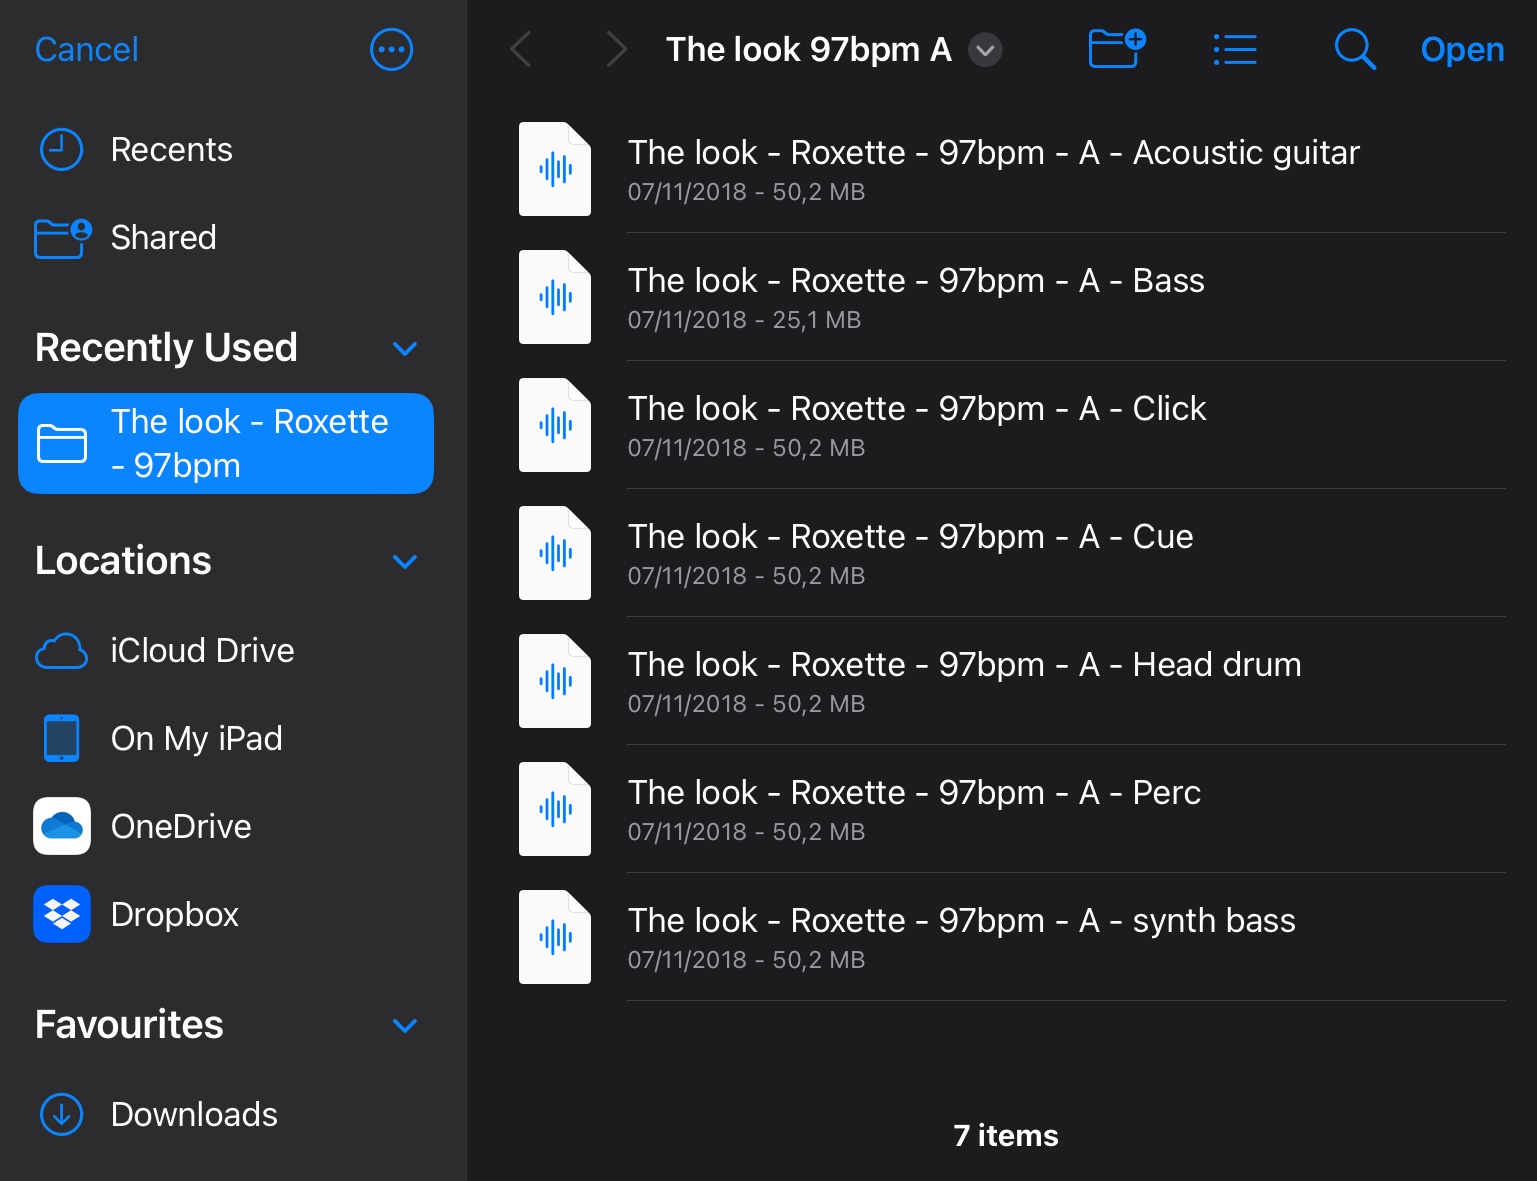
A song bundle is a set of audio files that belong together — one file per stem (e.g. drums, bass, keys, click, backing vocals). BackTrackR imports and groups these files as a single song in your library.
Typical bundle structure
- One folder per song containing multiple
.wavfiles - Each file is a separate stem you can mix independently
- Optional chart (lyrics, chords, Bars, Tab, PDF) stored with the song — see Charts
- Special stems (click, cue, timecode) and custom profiles for global mute / routing — see Special track routing
If you already work with stem-based backing tracks from a DAW or similar multitrack exports, your existing files should work without conversion.
Import from Files
The simplest way to add songs is via the iOS Files app — from iCloud Drive, a connected USB drive, or files shared from a Mac.
+ Add is two steps. First pick what, then pick where.
- Tap + Add + Add in the library.
- Choose Audio folders (for song folders and stems).
- Then choose Files, and browse to your song folder.
- Select the bundle (folder or files) and confirm import.
- BackTrackR copies the audio to local storage on your iPad.
Tip: Songs stay on your device after import. You can remove the original from Files without affecting playback in BackTrackR. Put tempo and key in the filename when you know them — see Tempo, key & filenames. A ChordPro file in the song’s chart/ folder (.cho / .chopro) is converted on import when no chart exists yet — see Charts.
Prefer a Control / SMPTE-only song with no stems? Use Library → + Add → New Song instead. Follow starts for New Song and imports are covered under Timecode.
Bringing a whole OnSong library? Use + Add → OnSong — see Import from OnSong.
Import from Dropbox, OneDrive & Google Drive
You can browse and import songs directly from your own Dropbox, OneDrive or Google Drive.
- Tap + Add + Add in the library.
- Choose Audio folders, then Dropbox, OneDrive or Google Drive.
- Sign in with your cloud account (one-time per service).
- Browse your folders and select a song bundle to import.
- Audio is downloaded and stored locally on your iPad.
Authentication tokens are stored securely in your device's Keychain. Cloud access only happens when you actively browse, import, or back up — not in the background. The same providers are available under Settings → Backup for library backup and restore (see Backup & restore).
Import from OnSong
You can bring a whole OnSong library into BackTrackR — lyrics, PDFs, linked audio, MIDI maps, and setlists / books.
This is different from using OnSong live over MIDI. For that, see OnSong workflow.
What to pick
- In the library, tap + Add + Add.
- Choose OnSong.
- Then choose Files, Dropbox, OneDrive, or Google Drive.
- Pick a complete OnSong
.backupfile, a zip, or the OnSong Documents folder.
You get a review of what will come in — lyrics, PDFs, linked audio, MIDI, and setlists — before anything is written. Tick or untick items, then apply.
How songs match
BackTrackR matches on title + artist.
- If the song is already in your library, the chart lands on that song.
- If it is new, BackTrackR creates the song.
- Linked audio comes along. Loose WAV files that are not linked in OnSong do not.
- The sample song Welcome To OnSong is skipped.
Section names from the import are added to your Charts section list, so you can stamp them on other songs too.
Tip: If you only pick audio folders and land on an OnSong backup by mistake, BackTrackR offers Import as OnSong instead of failing.
Tempo, key & filenames
BackTrackR fills Title, Artist, Tempo (BPM) and Key from your file and folder names at import. If tempo or key is still missing, the app can detect them from the audio in the background — detect only fills empty fields; it does not overwrite values already set by the name or by you in Edit.
Where values come from
- Filename / folder name — parsed at import (fastest, most reliable when you know the values)
- Song manifest — values already stored with the song
- Automatic detect — listens to the WAV stems when BPM or key is still empty
- You typed it in Edit — your values are kept; background detect will not overwrite them
Best practice: Name files with tempo and key when you know them. Use detect only as a fallback for songs that arrive without that information.
Name files for best results
Separate parts with space-hyphen-space ( - ). Underscores in names are treated like spaces. Tempo and key can appear in any order; the remaining text becomes Title, then Artist. On multi-stem songs, the part that differs per file is the instrument/track name.
My Song - Band Name - 120bpm - Am - BAS.wav120bpm - My Song - Am - Band Name - GUITAR.wav(same metadata — order of BPM/key does not matter)My Song - Band Name - 128bpm.wav(single file)- Folder name fallback:
My Song - Band Name - 120bpm - Embedded in free text:
drum_loop_120bpm,sang titel (Am, 103BPM)
Tempo forms: 120, 120bpm, 120 BPM, bpm120 (range 20–300). Key forms: Am, C#m, Bb, Fmaj, G minor, or a root in brackets like (C).
Automatic detect (when names are incomplete)
After import, if BPM and/or key are still unknown, BackTrackR queues background analysis — one song at a time while the app is idle. You can keep browsing the library.
In the library BPM and Key columns:
- Number / key (e.g.
120,Am) — value known - Spinner — detect is running or queued
- ? — detect finished but could not decide confidently (or key was skipped — no suitable harmonic stem). Enter the value yourself, or run detect again.
- — — still unknown; detect not finished or not queued yet
Stop playback first: Tempo/key detection does not run while a song is playing. If detect was mid-analysis when you press Play, it pauses and restarts that song from scratch after you stop — so a half-finished guess is never saved.
Re-run detect
- Library: long-press the BPM or Key column, then release (status shows “Release to detect…”). Runs that field only.
- Edit Edit
 (pencil on the show screen): open the song → tap Detect tempo and/or Detect key.
Show, hide, or reorder the BPM and Key columns under Settings → General → Song list metadata — that only changes what you see, not whether detect runs. See Song list metadata.
Why you might see “?”
- Stems are very quiet, sparse, or not rhythmic
- No clear tonal centre (noise, speech, effects-only)
- Conflicting stems — the app refuses a low-confidence guess rather than inventing a wrong BPM
- Key skipped: only percussion / click / timecode stems — nothing tonal enough to analyse
What BPM is used for
- Timeline → Bars and musical Snap — need a stored song BPM (name, detect, or typed). An empty field that only looks like 120 does not count.
- Pitch & tempo — uses the song’s stored BPM when present
See also Navigate the arrangement and Pitch & tempo.
Setlists & organisation
As your library grows, use setlists to group songs by project, band, or service type.
- Create setlists for different gigs or worship sets
- Add and remove songs without deleting them from the library
- Reorder songs with the grip on the row (no up/down chevrons)
- Use a setlist as a starting point when building a cue list
Search & sort
Tap Search Search in the library to find songs by title, artist, song ID, or tag. This is especially useful with large libraries spanning multiple projects or years.
Search works across your full library regardless of which setlist you are viewing. The results card stays above the keyboard so you can keep typing.
Sort
In the Songs toolbar, open the Sort menu. Your choice is remembered:
- Title — A→Z only (direction is locked). The A–Z rail jumps to a letter.
- Artist
- Date added
- Last played / Most played — update when you play a song
- Favorites — marked songs first, then the rest by title
- ID
The A–Z rail stays in the toolbar for every sort, but it only works when you sort by Title — otherwise it is dimmed.
Favorites & tags
Mark songs you use often, and add short labels so they are easy to find later.
Favorites
A favorite gets a gold dog-ear on the song row — in the library, setlists, cues, and the Charts song list.
- Hold a song → Favorite to turn it on or off.
- You can also mark favorites in Edit, or with bulk Select.
- Sort → Favorites puts marked songs first, then the rest by title. See Search & sort.
A separate green dog-ear top-right is staging status (spinner while loading, check when Ready) — not a favorite. Library and Charts keep that Ready state in sync when you browse.
Tags
Tags are free labels you type — for example worship, encore, or a band name.
- Hold a song → Add Tags…
- Or add them in Edit, or with bulk Tag…
- Search matches tags as well as title and artist.
Cue and setlist rows show the gold corner, but you change the favorite on the library song.
Song list metadata
Under Settings → General → Song list metadata you control which labeled columns appear on library, setlist, and cue rows — and in which order.
Show or hide columns
Toggle each field on or off:
- Show BPM
- Show duration (Time) — off by default
- Show timecode (TC) — song Follow start; cue in-point when set — on by default
- Show key
- Show MIDI trigger
- Show song ID
Turn all of them off to see title and artist only.
Change column order
Drag by the grip on a row to set the left-to-right order of the metadata columns. The same order applies everywhere those columns appear — library, setlists, and the cue list.
Tip: Hiding or reordering columns does not change stored song data or stop tempo/key detect. For BPM/Key values and filenames, see Tempo, key & filenames.
Backup & restore
Export your full library — songs, mixer presets, cue list, setlists and app settings — into a portable folder. Restore on a new iPad without re-importing songs or re-analysing waveforms.
Open Settings → Backup (in the settings sidebar footer, with About and Advanced). Do not use the Layout editor’s “Backup & restore” — that only saves widget layout JSON.
Demo song
Try BackTrackR before you import your own stems.
- First launch — accept Download demo song in the overlay (~85 MB).
- Empty library — tap Download demo song at the top of the song list.
- Settings → Backup → Demo song — download again anytime.
Demo Song 1 includes stems, mix preset, chart, timeline markers and loops. Your existing songs and settings stay as they are.
What’s included
- Included: song audio, manifests, waveform peaks, mixer/FX/routing per song, charts (lyrics, chords, PDF, tabs), cue list, setlists, and app settings (MIDI mappings, foot pedals, widget layouts, routing, audio prefs, …)
- Not included: Dropbox / OneDrive / Google Drive sign-in (Keychain — log in again after restore), and support/diagnostic logs
Estimated size is shown at the top of the Backup screen.
Create a backup
- Choose Full backup or Update existing.
- Tap Create backup… → Files (iCloud / On My iPad / USB), Dropbox, OneDrive, or Google Drive.
- Wait for progress, then keep the folder named
BackTrackR_Backup_YYYY-MM-DD_HHmm/.
Save the mixer first if you have unsaved mix changes — Create backup (and Delete library) will ask you to save or cancel.
Full vs Update
- Full backup — new dated folder with the entire library (clean snapshot).
- Update existing — refreshes an existing backup folder. The catalog always updates; song files only upload when missing or size differs.
Important: Update does not remove songs you deleted on the iPad from the backup folder. For a clean mirror, use Full backup (new folder) or delete the old backup yourself.
Restore
- Pick Merge with library or Replace entire library first.
- Tap Restore from backup….
- Choose Files / Dropbox / OneDrive / Google Drive and open the
BackTrackR_Backup_…folder. - For Replace only: confirm once (“Replace entire library?”).
- Merge — adds/updates songs from the backup and keeps local-only songs. Existing songs keep their local Follow starts (incoming overlaps move to the timeline tail). Cue list is replaced from the backup; setlists update by id; app settings are fully applied when present.
- Replace — wipes the current library (songs, presets, cues, setlists), then restores from the backup.
iCloud Drive restore installs song-by-song as files land (you do not wait for the whole archive first). Peaks are reused — no waveform re-analysis. On a new device, install BackTrackR → Restore → sign in to Dropbox / OneDrive / Google Drive again if you use cloud import or backup later.
Danger zone
Delete entire library… removes songs, mix presets, cue list and setlists on this iPad. App settings and cloud backup folders stay. Confirmation is two-step — create a backup first if you need the data.
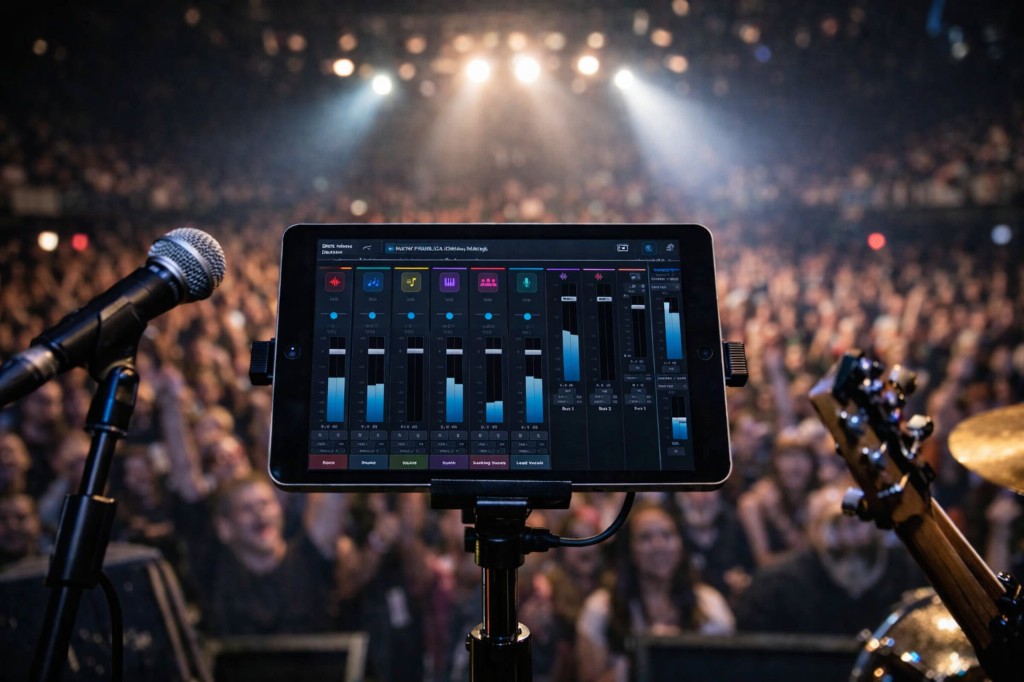
The mixer
Every imported song opens in a full mixer with independent control over each stem:
- Faders — adjust level per stem
- Mute — silence a stem without moving the fader
- Solo — hear one stem in isolation while rehearsing
- Pan — place stems in the stereo field
- EQ / COMP / Reverb — open the per-strip FX overlays (see EQ, compressor & reverb)
Set your mix during rehearsal so each song sounds right every time you play it live.
EQ, compressor & reverb
Each mixer strip can open a fullscreen EQ, COMP or Reverb overlay for that track (or bus / master). Dial in the sound during rehearsal; settings are stored with the song’s mix preset.
- EQ — multi-band equaliser with graph editing and optional RTA while the overlay is open
- COMP — dynamics with input / gain-reduction / output metering
- Reverb — per-strip reverb for space and depth without bouncing stems offline
Closing the mixer (or covering it with Edit / Settings) suspends strip level meters to save CPU; EQ RTA in the overlay is independent while you are shaping that strip.
Tip: For a gig-ready print with EQ/comp/reverb baked into stems, use Edit → New Copy (mixdown options). Live FX stay editable until you bake.
Mix presets
Once you have dialled in a mix, save it as a preset for that song. Your fader positions, mute states, pan, EQ, compressor and reverb settings are recalled automatically the next time you open the song.
Each song stores its own mix independently — changing one song does not affect others in your library or cue list.
Note: This is not the same as Control Track Recall lists (named MIDI Performance / scene loads for external gear).
Edit song & tracks
Open Edit Edit (pencil on the show screen) to change song metadata, manage stems, open a chart, and create a New Copy. This is separate from the Timeline Timeline , which is for arrangement and loops.
In portrait, the song list opens from the menu button as an overlay so the editor uses the full width. Landscape keeps the fixed sidebar split. Settings uses the same portrait overlay pattern.
Metadata
Edit Title, Artist, Key, Tempo (BPM) and Song ID. Tap Save song when you are done. For tempo and key from filenames or auto-detect, see Tempo, key & filenames.
Also under Edit:
- MIDI Clock — Follow (default) or Off for this song when Sync → Send MIDI Clock is on. See MIDI Clock.
- Timecode — song
0:00offset, frame rate, Follow/Off, optional Lock start, and Generate LTC (baked SMPTE stem). See Timecode. - New / Open chart — lyrics and chords for this song. See Chart editor.
Track list
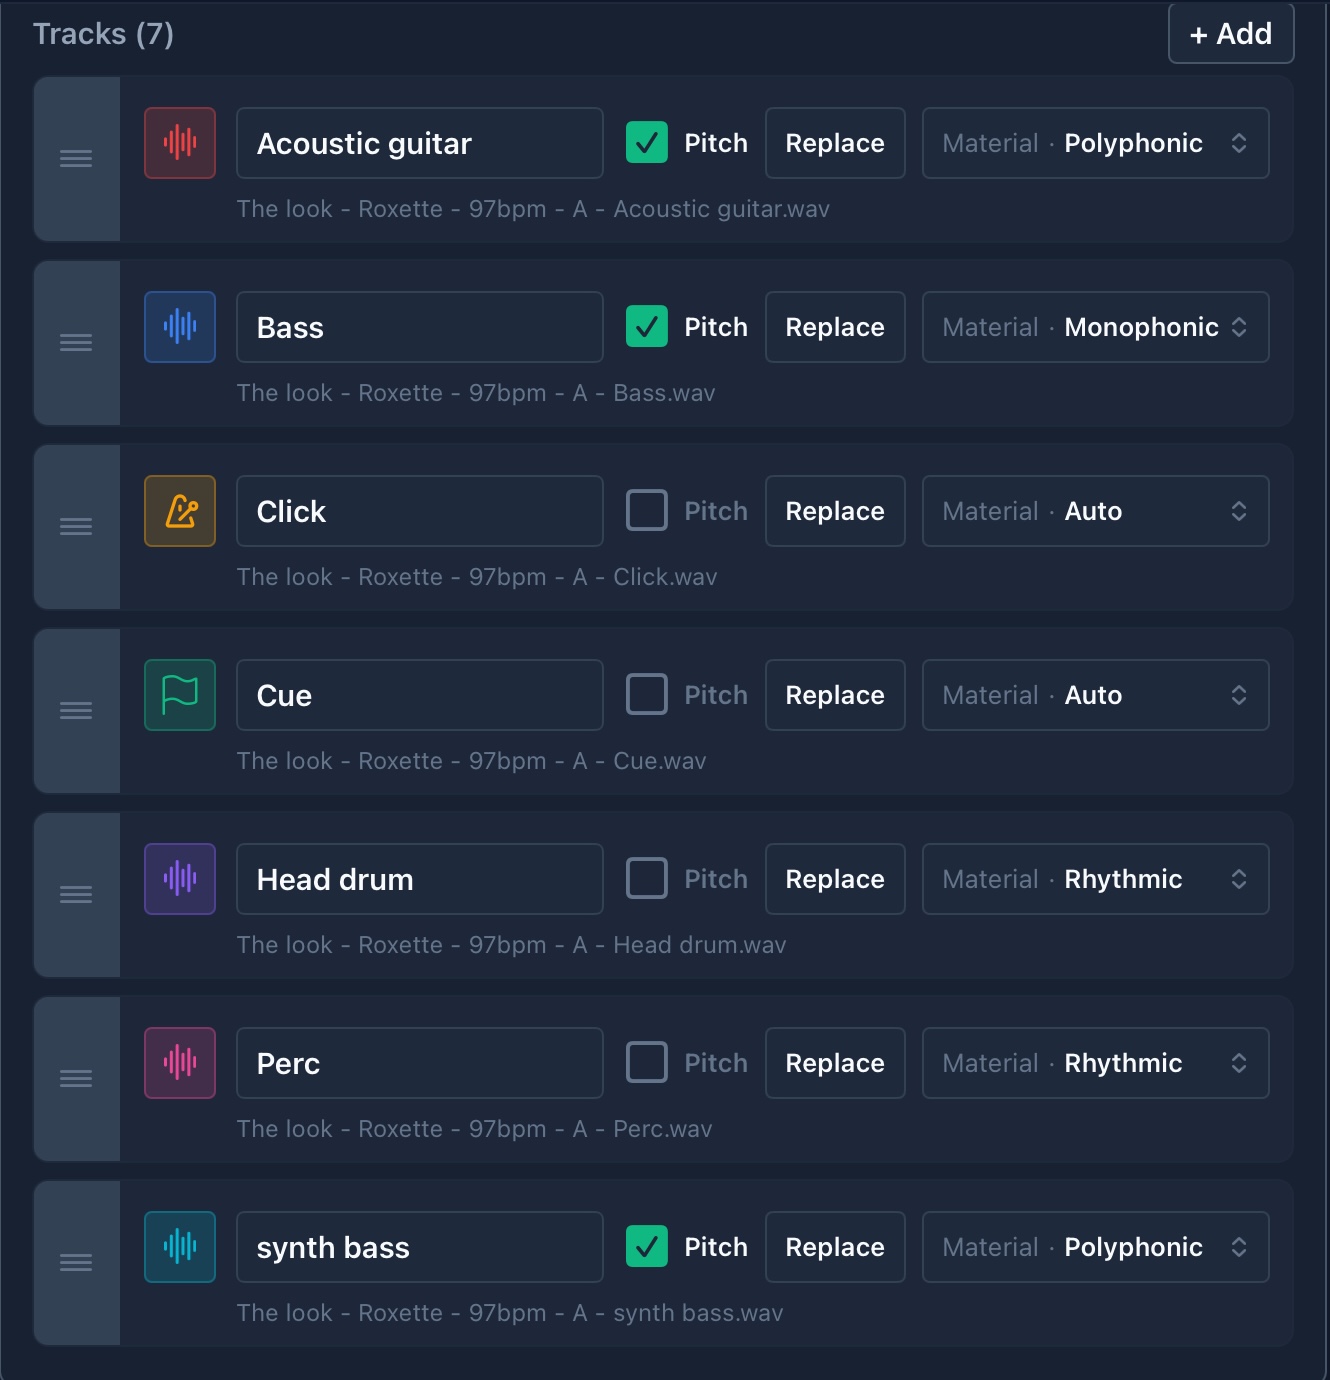
Each stem appears as a row with colour, icon, name, filename and options such as pitch follow. Reorder tracks with the grip on the row. A song can hold up to 64 tracks.
Add tracks
Add one or more stems to a song that is already in your library — you do not need to re-import the whole folder.
- Open the song in Edit.
- In the Tracks header, tap + Add (or Add+).
- Choose a source — the same menu as Library import: Files, OneDrive, Dropbox, or Google Drive.
- Pick the audio file(s). They are copied into this song’s folder and appear in the draft track list.
- Tap Save song to commit. Waveforms update and the mixer / Timeline pick up the new lanes when the song is loaded.
Note: Add+ is disabled when the song is already at the 64-track limit.
Replace a track’s audio
Swap the audio file behind an existing track without losing that track’s mix, EQ, or Timeline offset — the track identity stays the same; only the file changes.
- Open the song in Edit.
- On the track row, tap Replace next to the filename.
- Choose where the replacement file is stored (Files or cloud, same as Add+).
- Pick one audio file.
- Tap Save song to commit the swap. Peaks and playback reload for that stem.
Delete a single track
You can remove one stem from a song without deleting the whole song:
- Open the song in Edit.
- Swipe the track row to reveal Delete.
- Confirm Delete track? — the track is removed from the draft list.
- Tap Save song to delete the audio file from the song bundle for good.
Important: Add+, Replace and swipe-delete all stage changes in a draft. Until you Save song, the previous audio stays on disk. After Save, orphaned files are cleaned up, the mixer and Timeline update, and the live engine reloads if the song is loaded. You cannot delete the last remaining track in a song.
Pitch & tempo
Adjust pitch and tempo per song during rehearsal — useful when adapting a backing track to a singer's key or matching the tempo of your live band.
- Pitch — transpose the song (shows the new key when the song has a key set)
- Tempo — speed up or slow down playback
Live pitch and tempo apply during practice and performance. For a gig-ready song with lower CPU load, open Edit → New Copy to mixdown your multitrack stems with pitch and tempo applied. The copy plays at 1:1 afterwards. A pitched copy also transposes chord names on that song’s chart.
Under Settings → Audio & mixer → Live pitch/tempo quality choose how live stretch sounds vs CPU:
- System (low CPU) — default; cheapest; can sound “chipmunk” on big pitch moves
- Balanced / High — more natural timbre (formant compensation on monophonic material); higher CPU — watch the DSP & CPU strip
You can turn off live stretch under Settings → Audio → Live pitch & tempo if you only use New Copy songs and want to save CPU.
Building a cue list
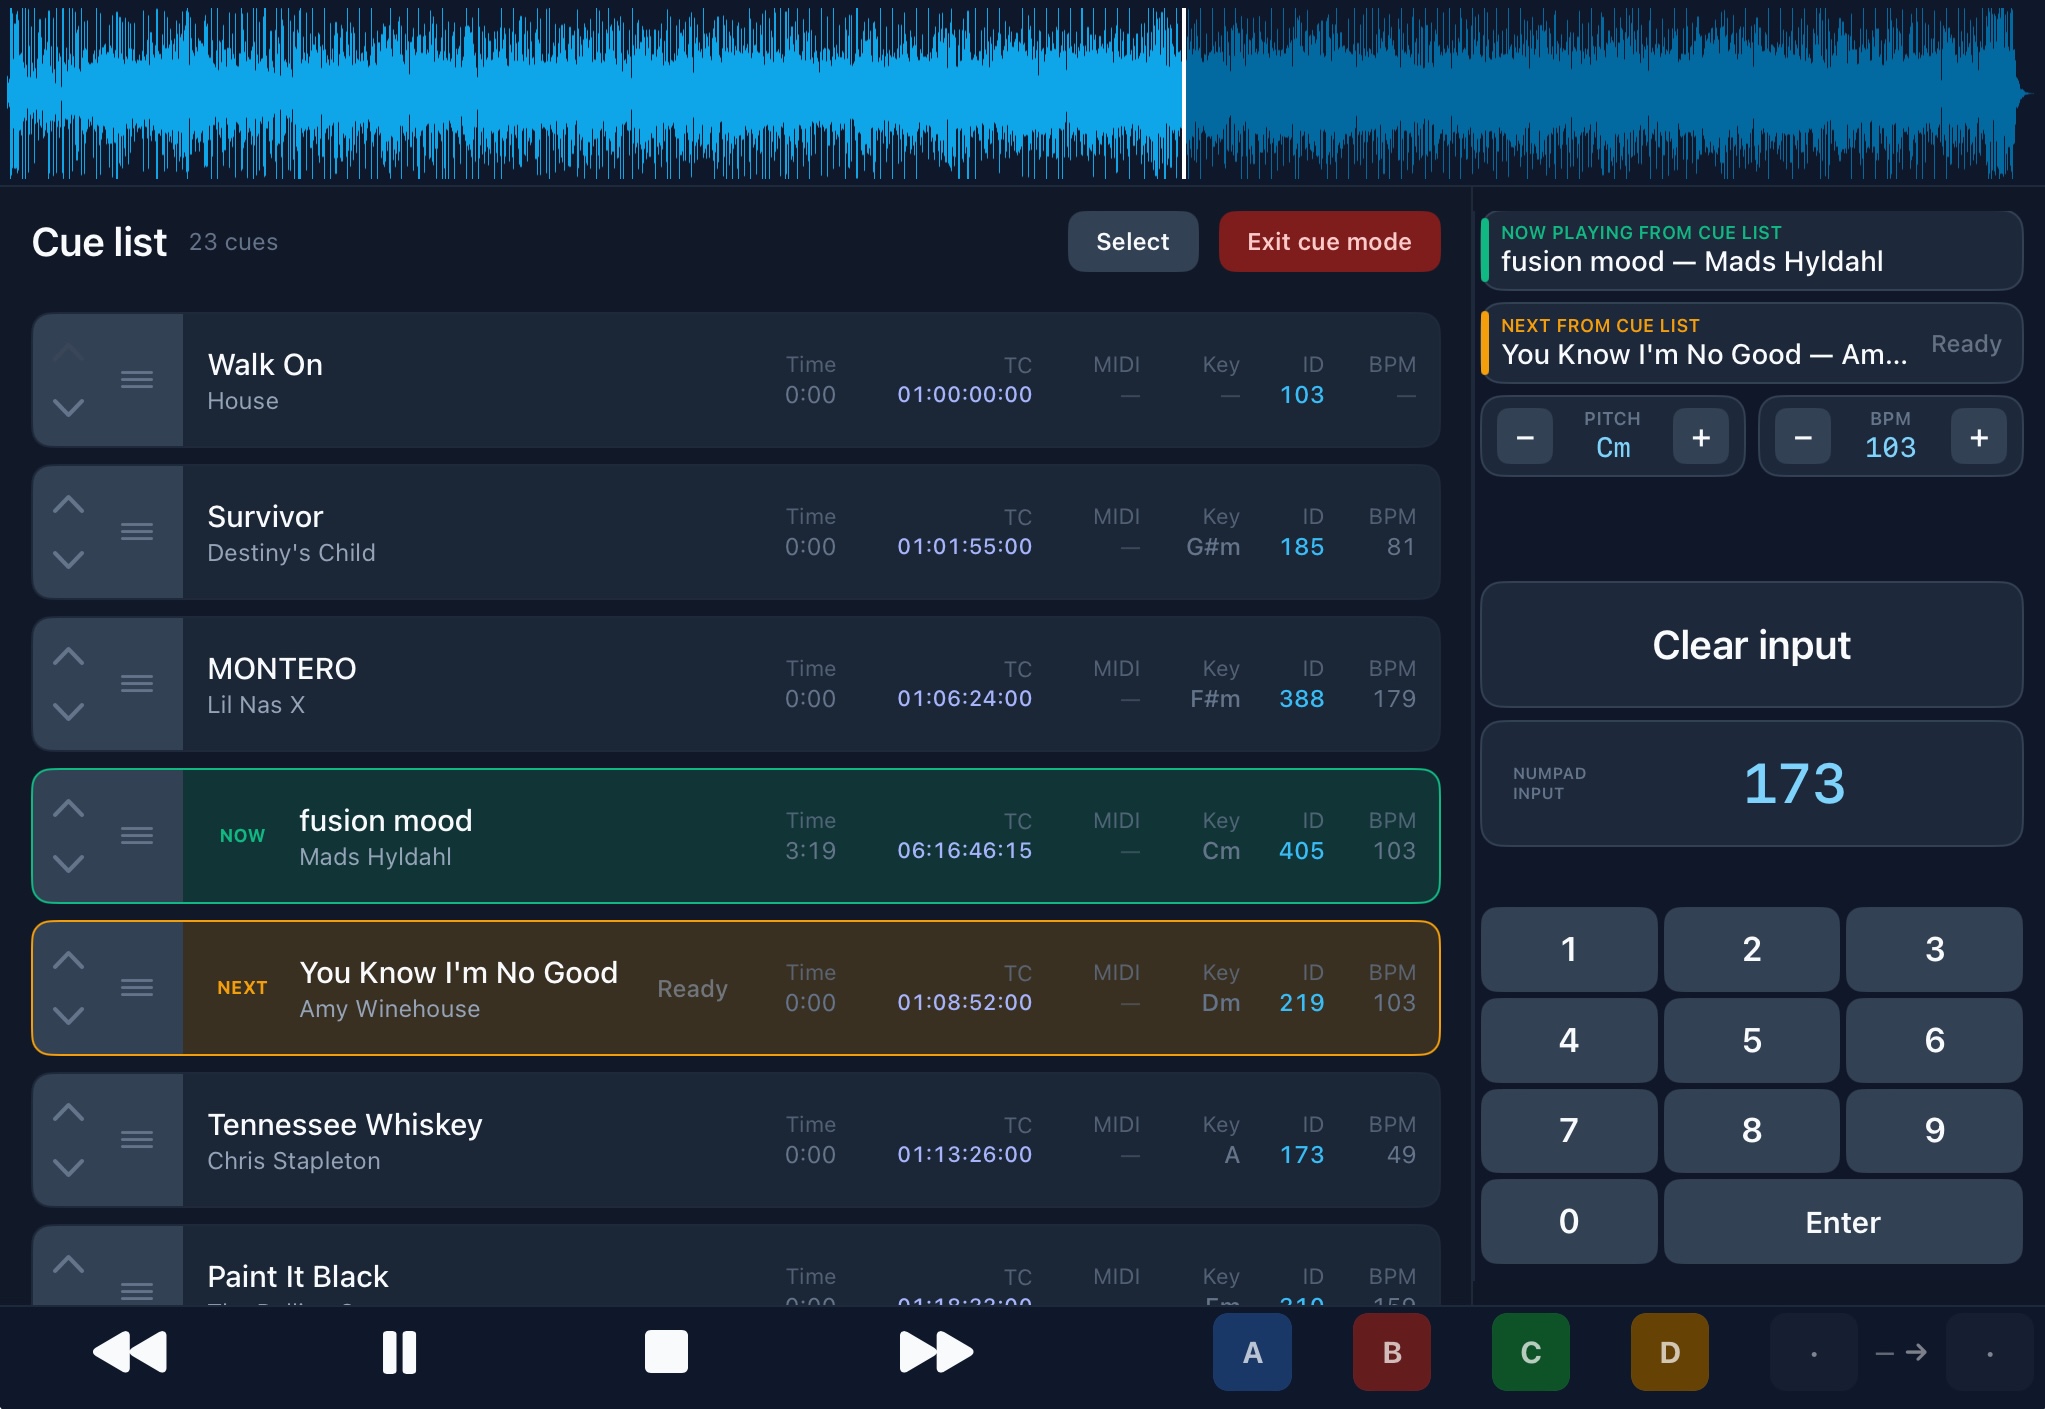
A cue list is your running order for the gig — the sequence of songs you will play, in order.
- Create a new cue list (or open an existing one).
- Add songs from your library in performance order.
- Reorder with the grip on the row if the set changes (no up/down chevrons).
- During the show, BackTrackR shows which song is NOW and which is NEXT.
Auto-advance moves to the next cue when the current song ends. Auto-play next cue (under Settings → Playback → Cue list) decides whether that advance also starts playback — off means the next song loads and stages, and you press Play yourself. Next / Prev work the same way. Under Settings → Playback & cues you can also enable Follow playback so the list scrolls with the current song.
Selected and NEXT rows show a green dog-ear top-right while staging (spinner), then a check when Ready. Optional full-screen Loading / Ready cards live under Settings → Playback → Announcements (off by default) — they show the song title while loading, then Ready when it can play.
Cue list + timecode
For SMPTE shows, context-menu a cue row → Set timecode in-point. Chase prefers cue intervals over library Follow windows, and when a chased song is on the cue list it becomes NOW with NEXT preloaded. Typical flow: Auto-allocate Follow starts → arm the first cue → let chase promote songs as TC advances. See Timecode.
Charts overview
Charts is BackTrackR’s lyric and chord page. Write the words, put chords on them, add a short note if you need one, and open that page on stage — it can scroll with the song as you play.
The chart belongs to the song, same as the mix. Backup, cloud import and New Copy keep it. A pitched New Copy also moves the chord names to the new key. Songs without a chart are fine — Live just shows an empty page.
Open Charts
- On the show screen, tap the Charts Charts
 widget (next to Mix Mix and Timeline Timeline).
 - Or open Edit → New chart / Open chart.
- On the live page, the pencil Edit opens the editor. Turn off Performance lock first.
Every stock layout already has the Charts widget. Preset D · Chart uses a thin header and footer so the page is large.
Tip: Mix Mix, Timeline Timeline and Charts share the middle of the screen — opening one closes the others. Header and footer stay around the page until you tap Focus.
Charts Live
This is the page you read on stage. Chords sit above the words they belong to.
Make the page bigger
Tap Focus Focus . Header and footer hide, and the lyric page fills the screen. Play / Stop / Next sit at the bottom right, off the lyric column. NOW and NEXT stay in the corner dock. Tap Focus again to get the shell back, then tap Charts to close. There is no X in Focus.
On the live toolbar, Edit (pencil) sits before Focus. Reopening Charts or Focus brings back the last chart song you had open.
The song list
Tap the menu Menu button on the left of the toolbar (same icon style as Settings and Edit Song). The list slides over the page from the left — it does not squeeze the lyrics, so Bars and Tab stay the size you set. Tap the lyrics (or the menu again) to fold it away. Portrait uses the same overlay, not a drop-down.
Tabs inside the list: Songs | Setlists | Cues.
- Search Search
 — magnifying glass on the Songs tab (same overlay as Library).
 - Favorite — gold dog-ear on the row, same as Library.
- Tap a row to show that song’s chart and stage it (green Ready dog-ear) — or arm NEXT on a cue row. This does not start playback unless you play, or double-tap when that setting is on.
- Double-tap plays, if Settings → Playback → Double-tap plays song is on (default). Otherwise use Play, or hold → Play.
- Hold a song for Play, Favorite, Add Tags… and Delete. Hold a cue row for Play.
- + Cue on the row adds it to the cue list. Setlists and cue detail reorder with the grip only.
- Tap the lyrics (or outside the list) to close it.
Fold song list on select (Settings → Charts → Live, on by default) closes the list after you pick a song so the chart fills the drawer. With double-tap play on, the list waits briefly so a second tap can still hit the row.
When NOW changes, the list follows. Opening the widget sidebar also overlays the page in landscape. An optional switch under Settings → Charts keeps the list folded after you close that sidebar.
If you staged a different song and then open Timeline, BackTrackR asks before switching the loaded song. The Timeline footer names the song that is loaded.
Follow the song
- Off — you scroll.
- Page — jumps to the next section you placed on the Timeline.
- Continuous — the current heading eases to the top.
Scroll by hand and Follow pauses. Tap Follow Follow again to catch up. Until the first Chart-lane marker — and at song open — the page stays on the title and key. No markers means you scroll yourself.
Transpose and Style
The tuningfork Transpose menu changes chord names on screen. Each row is one semitone with the destination key (for example -1 F#), plus Reset — same labels as the editor. The chart file is not rewritten, and audio never changes from the chart. Turn on Follow pitch under Settings → Charts if you want those names to follow the backing-track pitch control as well.
Style Style opens the same popover as the chart editor: tabs Size | Style | Sections. Under Size, set per-song type sizes and Page zoom for this orientation (landscape and portrait remember their own zoom). Double-tap Page zoom to jump back to 100%. Greyed on a PDF score.
Chart editor
Open from Edit → New / Open chart, or the pencil on the live page. Performance lock blocks the editor.
Two ways to write: Text (type lyrics and chords) and Chart (tap the page). Switch them in the header next to the title: Text | Chart. The ? ? is a picture legend of the toolbar icons — scroll it if the list is long.
Text
Type the words. Put a chord in square brackets right before the syllable — Amazing [C]grace. A line like Verse 1 becomes a heading. Other names use {start_of_intro: Indledning}. A section runs until the next heading.
Toolbar here is Key, Transpose and Import. Import a ChordPro file (.cho / .chopro) or lyrics from RTF, Word (.docx), HTML, or OpenDocument — from Files, iCloud, Dropbox, OneDrive or Google Drive, same places as songs.
Tap to place the caret. While the keyboard is up, a small arrow cluster floats above it. Save, Discard and the toolbar close the keyboard first.
Chart
The laid-out page. One paint tool at a time:
- Chord Chord — tap a word. Whole word is the default; switch on Mid-word to land on a letter. Wheels cover root, accidentals, quality, extensions, alterations and bass. Apply, or None to clear.
- Highlight Highlight — pick a colour on the square in the top-right of the page, then tap a line. Same colour again clears it; a new colour overwrites. Highlights stay in the chart and are not written to ChordPro export.
- Bold B / Italic I — tap a word to toggle.
Key, Transpose, Style
- Key Key — the chart’s own key (separate from the song key in Edit). Used for spelling.
- Transpose Transpose — rewrites the chords in the file (and on Bars). Each row is one semitone with the destination key, for example
-1 Ab. Slash chords move both root and bass. This does not change the audio. Live transpose (tuningfork) does not rewrite the file. - Style Style — same popover as Live: tabs Size | Style | Sections. Size is Title / Section / Lyric / Chord point sizes for this song, plus Page zoom for this orientation. Style and Sections match Settings → Charts (fonts, chord colour, section names). Leave page zoom on the Page slider — do not bake it into the type sizes, or Bars and Tab drift off the lyric lines.
Save vs Discard: Undo and Redo step through your edits. Save keeps the chart with the song. Discard goes back to the last saved version.
Sections, Bars, Tab, Notes & PDF
These chips only show in Chart mode — icon plus name, next to the paint tools: Section Section Bars Bars Tab Tab Note Note.
Section
Section is a tool: the name list stays open on the trailing side (landscape and portrait) until you pick Chord, Highlight, Bold, Italic, Bars, Tab or Note — or tap the rail’s X.
The list starts empty. Tap Create to add a name and a colour — Verse, Chorus, or anything you use. Names you create work on every song. Drag a name onto the page, or tap a name then tap to place. Headings pick up that colour.
With the rail open you can hold-then-drag an existing heading. Rail closed: headings stay put; tap one to rename it or delete it. Delete removes the heading only — the lyrics and chords stay.
The same list lives under Settings → Charts → Sections. Removing a name there does not change charts you already saved, unless you choose Merge.
Bars
Drops a chord grid on the lyric page — no card box, just a hairline at top and bottom. Time signature sets how many slots sit in a bar. 4/line / 8/line wrap the editor grid. Tap a beat and roll the wheels; × on the selected chord clears it (empty, not N.C.). Repeats like [: :] are notation on the grid — they do not loop playback. Use Timeline loops for that.
On the page: drag the side grips to set width (the header says Adjust width). A− / A+ zooms chords and barlines without changing that width. If names would overlap, fewer bars go on each line and extra rows grow.
Tab
Import Guitar Pro (.gp3 .gp4 .gp5 .gpx .gp), ASCII (.txt / .tab), or ChordPro tab from Files or cloud. Multi-track files open a Track menu (drums skipped by default). The crop sheet shows the whole track; the blue block is what you keep (starts at bars 1–8). Drag sideways to set the range; swipe up/down to scroll, or hold + / −. Place it on the page. There is no tab editor — Edit reopens the crop sheet. If a Guitar Pro 6 .gpx fails, export as .gp5 or .gp.
Wrap, Overlay, Scroll, Pin
Tap a Bars or Tab grid: Wrap | Overlay, Scroll | Pin, Edit and Delete sit on the grid. Wrap pushes the lyric lines below that band — not beside it. Wrap is Scroll only. Pin stays on screen while you scroll (Overlay only). Tap Wrap on a Pin grid and it hops to Scroll. Landscape and portrait remember their own place, width and zoom.
Notes
A note is a small reminder on the lyric page — a count-in, a cue, or a hint for the MD. This is new, so expect a few rough edges.
- Tap Note to drop a text box on the page you can see.
- First tap moves it. Second tap (or double-tap) lets you type.
- Tap the pin, then tap a word or a spot to draw an arrow to it.
- Font, colour and size sit on the note. Lock freezes it. You can hide the arrow without losing the pin.
- Empty notes stay out of Live. Notes with text stay on the page after you Save.
Import a .pdf to show the score on stage. Your lyrics stay. When a song has both words and a score, Lyrics | Score appears so you can switch. On the score, Text | Chart hides; Section stays so you can stamp flags on the page. Flags scroll and zoom with the PDF. Follow uses the same clock as lyrics. Key, Style and Transpose are greyed — pixels do not transpose. Pinch to zoom.
Timeline Chart lane
Mark where each heading sits in the song, so Charts Live can scroll for you. This is not Control Track MIDI and not the cue list.
- Make headings in the chart editor (or flags on a PDF).
- Open Timeline → toolbar Chart Chart.
- Tap Add at the playhead, or short-drag on an empty spot on the Chart lane.
A tap on the lane or the waves only parks the playhead. It does not create a marker. The same heading can be placed more than once (a repeating chorus). Markers are coloured chips that match the heading. On a selected marker, Lead Lead is ± seconds — scroll a little before or after the hit. Tap SAVE with your loops. Unsaved markers still drive Live while that Timeline session is open.
Between markers, Live eases (Continuous) or jumps (Page). Until the first marker the page stays on the title and key. No markers → you scroll.
Chart settings
Settings → Charts (own sidebar tab, after Playback):
- Follow pitch — live chord names follow the backing-track pitch control (off by default). The chart file is not rewritten.
- Fold song list on select — when on (default), tapping a song in the Charts list closes the list so the chart fills the drawer.
- Keep song list folded after sidebar — after you open the widget sidebar, the Charts song list stays hidden when you close it.
- Open in chart focus on launch — start in Charts Live + Focus when a song exists (cue first, else first library song).
- Sections — the same name + colour list as the editor. Empty until you Create a name, add one here, or import a chart. Removing a name here does not change charts you already saved, unless you choose Merge.
- Chart style — fonts and colours for every song. Point sizes stay per song in the Style popover Size tab.
Timeline overview
The Timeline is a multi-track arrangement view on the performance shell. You see waveforms for every stem, a playhead (locator), a loop lane, zoom and pan tools — plus optional Control Track lanes for timed MIDI cues and a Chart lane for lyric section markers.
It is for arrangement (waves, loops, Control cues, Chart-lane markers, alignment) — not for song title, BPM or creating a New Copy.
Timeline vs Edit
- Timeline Timeline — multi-track drawer: waves, loops, Control Track, Chart lane, stem offset
- Edit Edit — song metadata, track list (+ Add, Replace, delete a stem), Timecode / Clock, New / Open chart, and New Copy. See Edit song & tracks.
Tip: Load a song first, then open Timeline. Unsaved loop, Control Track, Chart-lane and offset edits are a draft until you tap SAVE.
Loops A–L
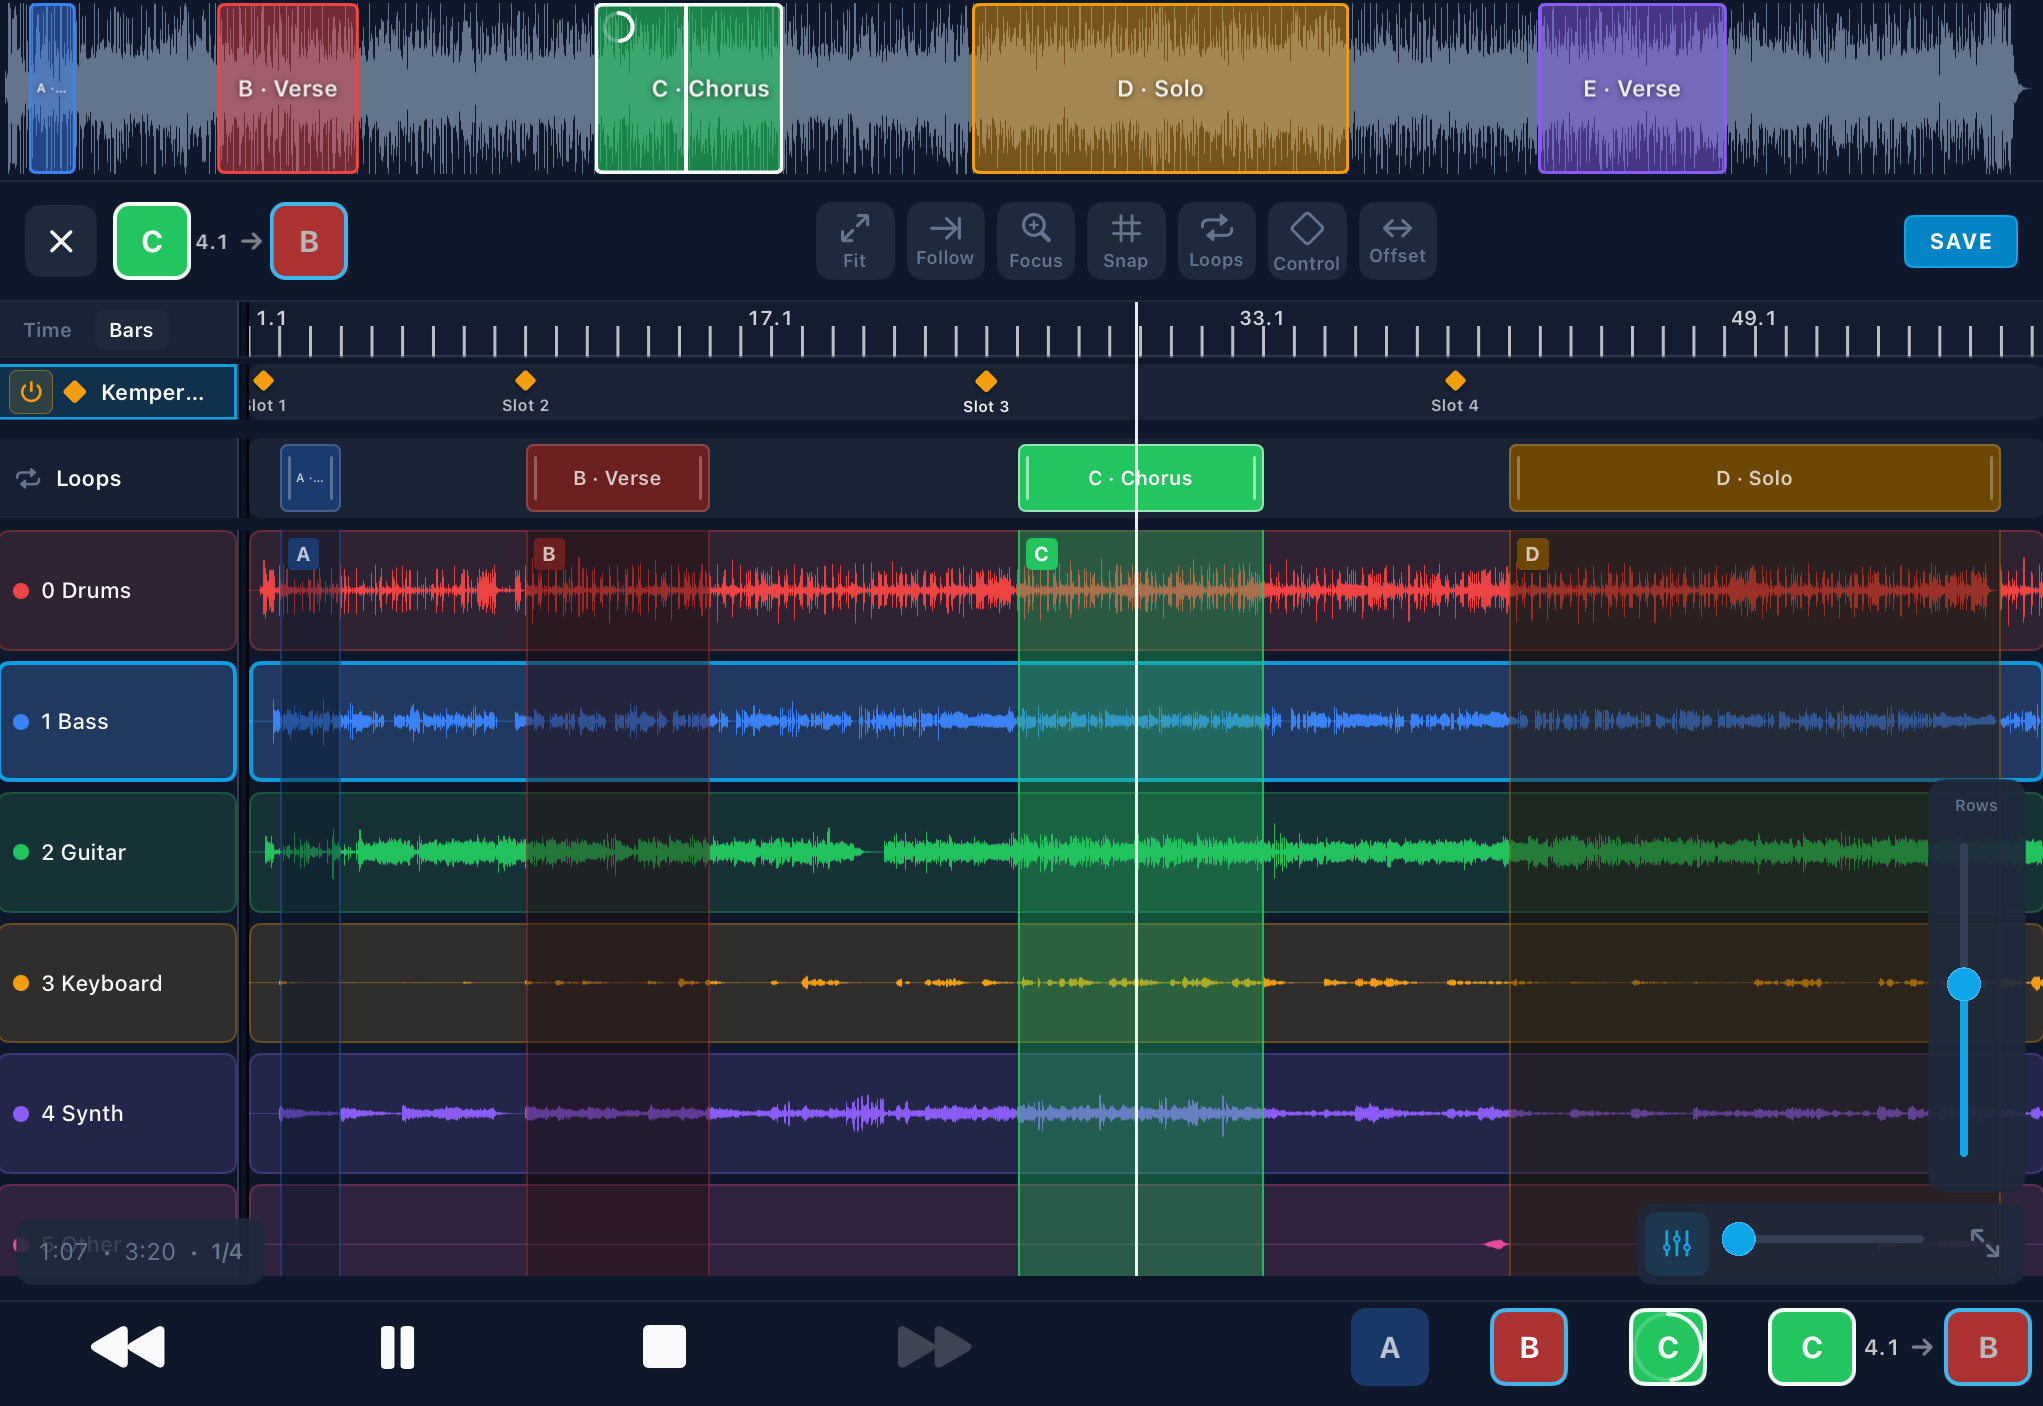
Each song has up to 12 fixed loop slots labelled A–L. The letter stays the same for MIDI, foot pedals and shell widgets across songs — so “pedal Loop A” always means slot A on the loaded song. An optional name (e.g. “Solo”) is only for display.
Create & edit
- Drag on the empty Loops lane, or tap a gray A–L chip
- Drag the bar to move; drag the edges to resize
- Tap the loop bar to select it for rename or delete — this does not arm or seek
- Use toolbar Name Name and Del Del when a loop is selected
- Long-press a filled chip → Move to another letter (empty = move; occupied = swap). Pedals and MIDI still target the letter.
Arm & disarm (playback)
- Tap a filled A–L chip to arm the loop. Dimmed = inactive; full colour = armed. A progress ring fills as you play through the loop. Timeline chips still arm under Performance lock while the drawer is open (shell widgets / MIDI / pedals stay locked).
- If the playhead is already inside the loop, playback stays put and wraps at the end. If it is outside, BackTrackR seeks to the loop start (and starts playback if stopped).
- Tap the same chip again to disarm (Leave) — playback continues forward in the song; it does not jump back to the loop start.
- Arm a loop, Stop, then Play from earlier in the song: the time display stays with the song until you reach the loop end. It does not jump ahead to the loop while audio starts from the beginning.
- Timecode chase: when Sync → Chase is on and the song’s Timecode is Follow, loop arm is unavailable (chips dimmed; MIDI/pedals ignored). Set the song to Off, or turn Chase off, to use loops. Editing loop regions is still OK. As TC master, loops are allowed but wrap jumps absolute TC — see Timecode.
SAVE: Loop and offset edits are a draft until you tap SAVE. Drafts survive switching Mix ↔ Timeline. Closing with changes asks Discard or Save & close. Loading another song clears the draft.
At end, Now & bar quant
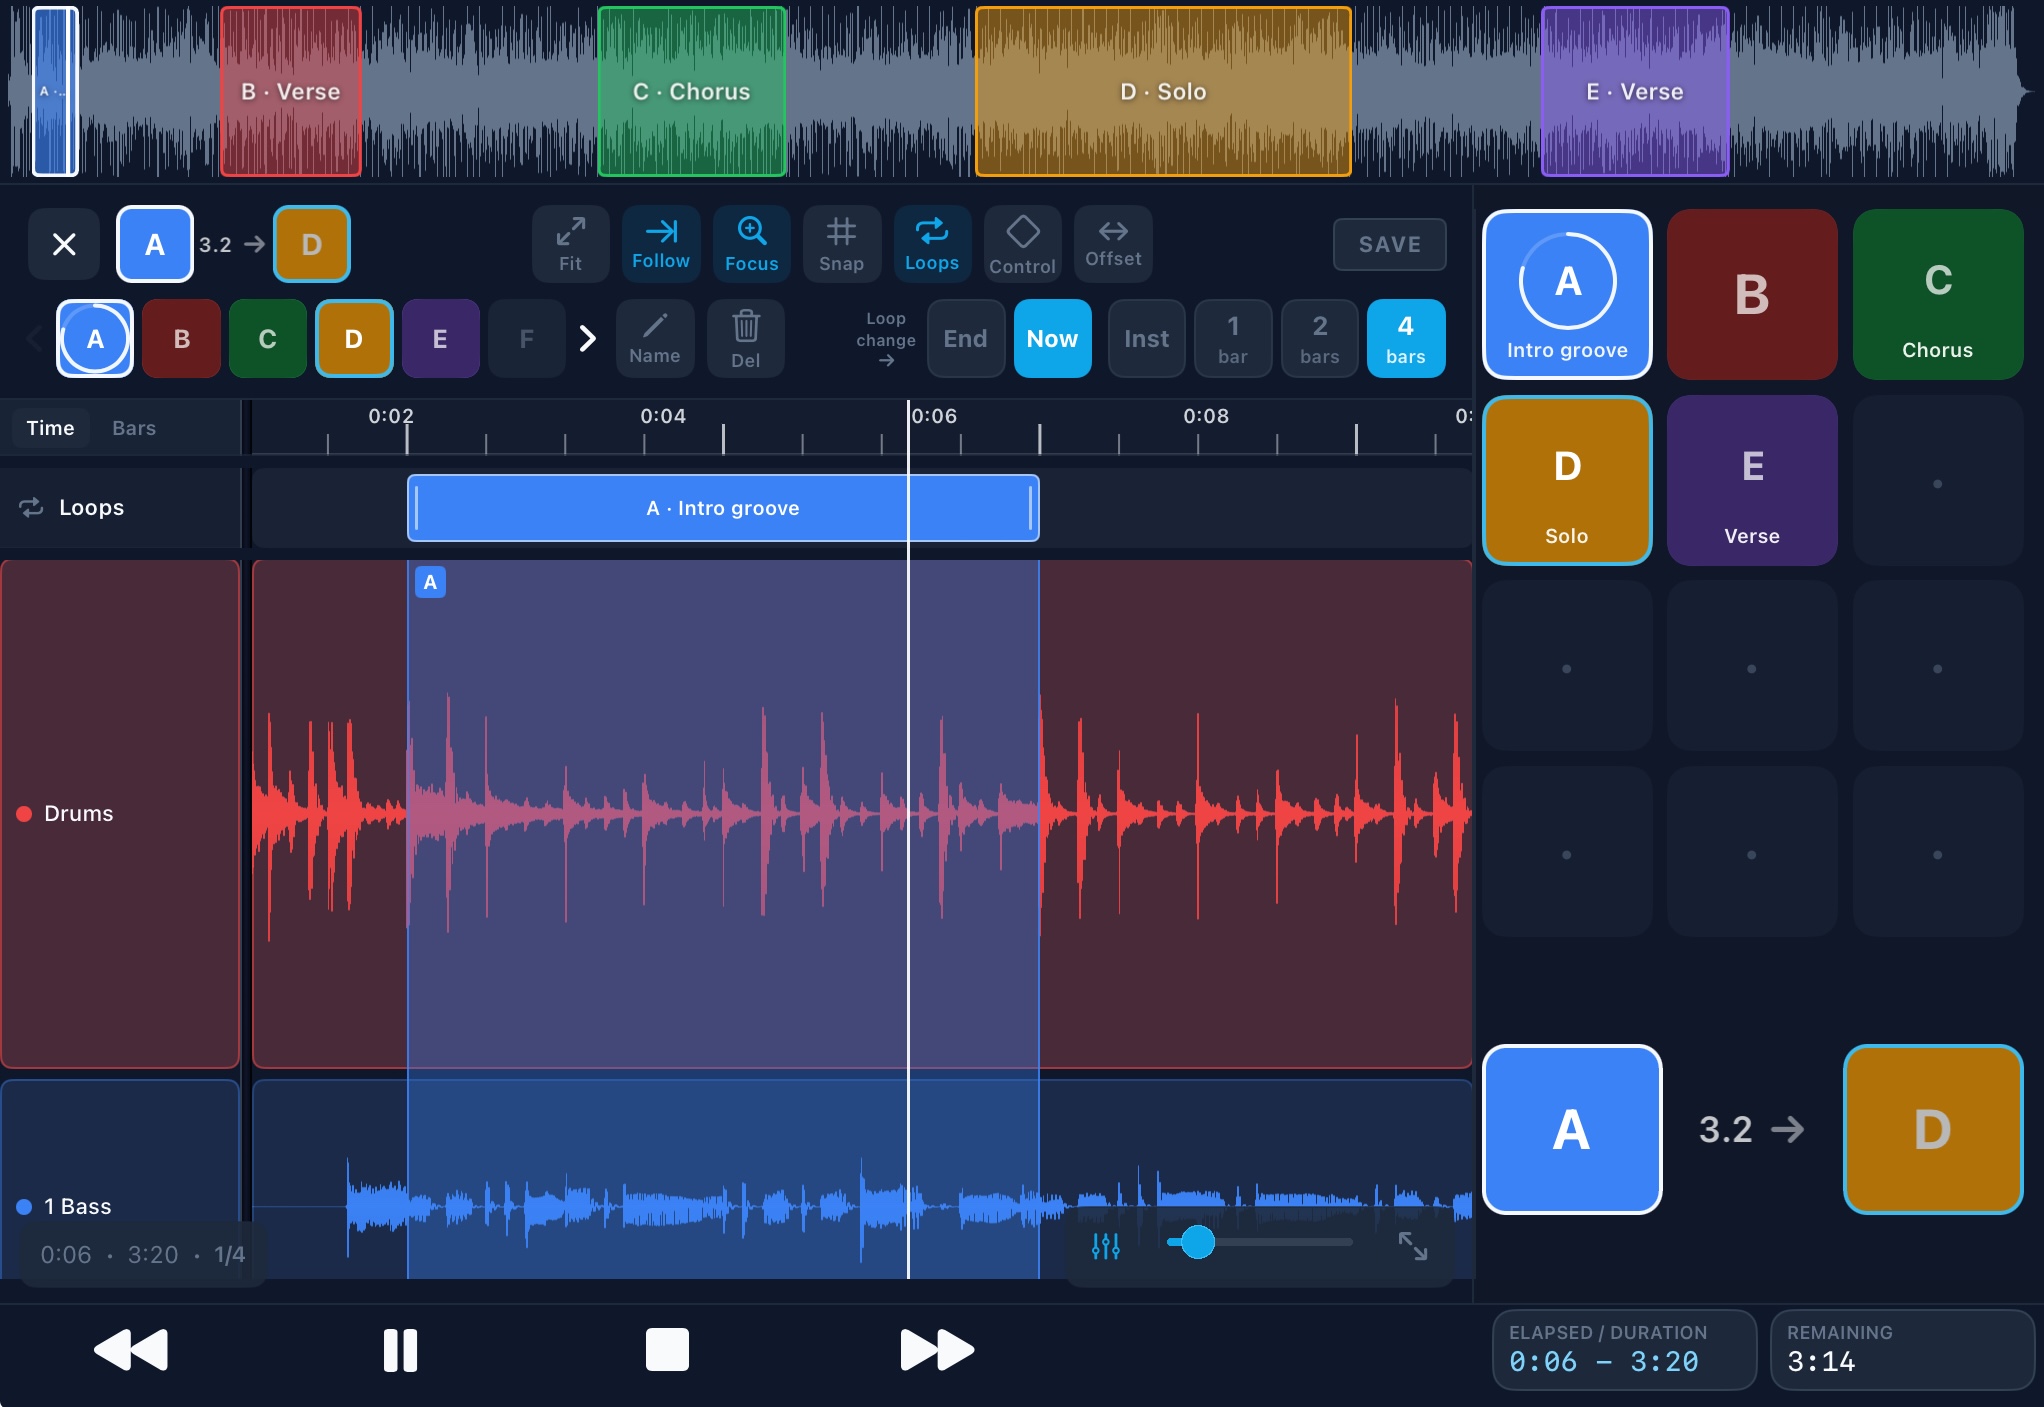
When you move from one loop to another, choose how the switch happens:
- At end (default) — queue the next loop; switch when the current loop wraps. Queued chip shows an accent outline; tap again to cancel.
- Now — switch immediately (clears any At-end queue).
Under Now, pick launch timing:
- Inst — hard seek now (your finger timing)
- 1 Bar / 2 Bars / 4 Bars — finish the current bar, count N full bars, then land on the downbeat — always in time
Bar quant needs a known song BPM. Inst always works. While armed, the countdown shows current → remaining → next.
Control Track (MIDI cues)
Timed MIDI cues on the song Timeline — patch changes, stomps, faders — synced to the playhead. Use it to automate a Kemper, Helix, or your own template while the backing track plays.
This is separate from Songs → MIDI → Output on play (one-shot at song start) and from MIDI Clock / timecode.
Control songs (no WAV import)
Library → + Add → New Song creates a silent mono bed so you can author Control / Recall / SMPTE without importing stems. Set duration in Edit, add real tracks later with + Add / Replace, and note that New Song places the Follow start at the timeline tail.
Basic flow
- Open Timeline → Control Control tool. There are no lanes until you add one.
- Add Track → name + template (Kemper Profiler, Helix, or My templates). The Control drawer opens over the Timeline.
- Live cue: play the song → tap pads / stomps / faders → Add at playhead. Staging builds a step chain; load (patch) vs FX/value auto-splits with a short delay you can edit.
- Edit events: name, cue time (clock on the row), Steps / Delay (0…1000 ms), Advanced MIDI, Test. Swipe left to delete.
- Tap Timeline SAVE — Control cues persist with loops and stem offsets.
With Control open, the zoom-bar vertical slider is labelled Control (lane height). Mute is per lane. Up to 8 lanes per song.
Templates & builder
- Kemper Profiler — Main / Amp · Pedals; Performance + Slot pads; factory Perf 1…125
- Helix — Main / Stomp for Floor / LT / Rack; factory presets 01A…32D
- My templates — New / Duplicate / Edit in the full-screen Template builder (named pages, colour picker, drag controls on a 24-col grid)
Recall lists
A Recall control is a named list of loads (e.g. Performances or Helix presets). Pick an addressing preset — Kemper Performance, Helix Presets, Program change, CC scenes, or Custom — then Load → pick a name → Add at playhead. Shared lists can be reused across templates. This is not the mixer’s mix-preset “recall”.
Tip: While chasing timecode, Control Track still follows the same transport as audio — it never runs ahead of an unloaded song. Prefer linear songs (no armed loops) when you are the room’s absolute TC master.
Stem offset
Shift individual stems left or right without changing song time or the locator at 0. Useful when one track has a count-in or starts late compared to the others.
- Turn Focus Focus off. Tap a track header (or the Offset Offset tool) to open the Offset panel.
- Nudge ±1 ms / ±1/16 / ±beat, or drag the selected wave horizontally.
- Align snaps the onset toward the beat grid. Reset clears this track’s offset.
- Apply to all tracks… — optionally Move loops too so A–L regions shift with the change.
- Tap SAVE with your loops.
Positive offset = delay (count-in silence). Negative = skip into the file.
Note: Offsets are live only for now — they are not yet included when you create a New Copy. That is planned.
Loops on stage
You do not have to stay in the Timeline drawer to use loops:
- Loop slot (A–L) widgets on the performance shell — arm/disarm with the same progress ring (Large size can show the loop name)
- Loop switch countdown widget — read-only display of the current → next switch timing
- Song overview — turn on Show loops to see colour bands and letters on the overview waveform
- Settings → MIDI → Loops — map Note / Prog / CC to Loop A–L (same arm path; respects At end / Now and bar quant)
- Foot pedals — assign Loop A–L actions (while BackTrackR is in the foreground)
Empty slots do nothing. Shell loop widgets, loop MIDI, pedals and Next/Previous are blocked under Performance lock — Timeline A–L chips still work while the drawer is open.
Performance dashboard
The dashboard is your on-stage control surface. Arrange widgets exactly where you want them:
- Transport — play, pause, stop, skip
- Timeline Timeline / Charts Charts / Edit Edit — open the arrangement drawer, the lyric page, or song Edit overlay
- Loop slot (A–L) and Loop switch countdown — arm loops and watch switch timing
- Song overview — progress or waveform; optional Show loops
- Timecode — absolute TC readout (LOCK / WAIT / FREE when chasing)
- MIDI in / out activity lamps, timers, cue cards, numpad and other shell controls
At the very top of the screen (system status bar), you can also show a light DSP & CPU load strip — separate from widgets.
Enter layout edit mode to drag widgets into position. Your layout is saved automatically.
DSP & CPU status bar
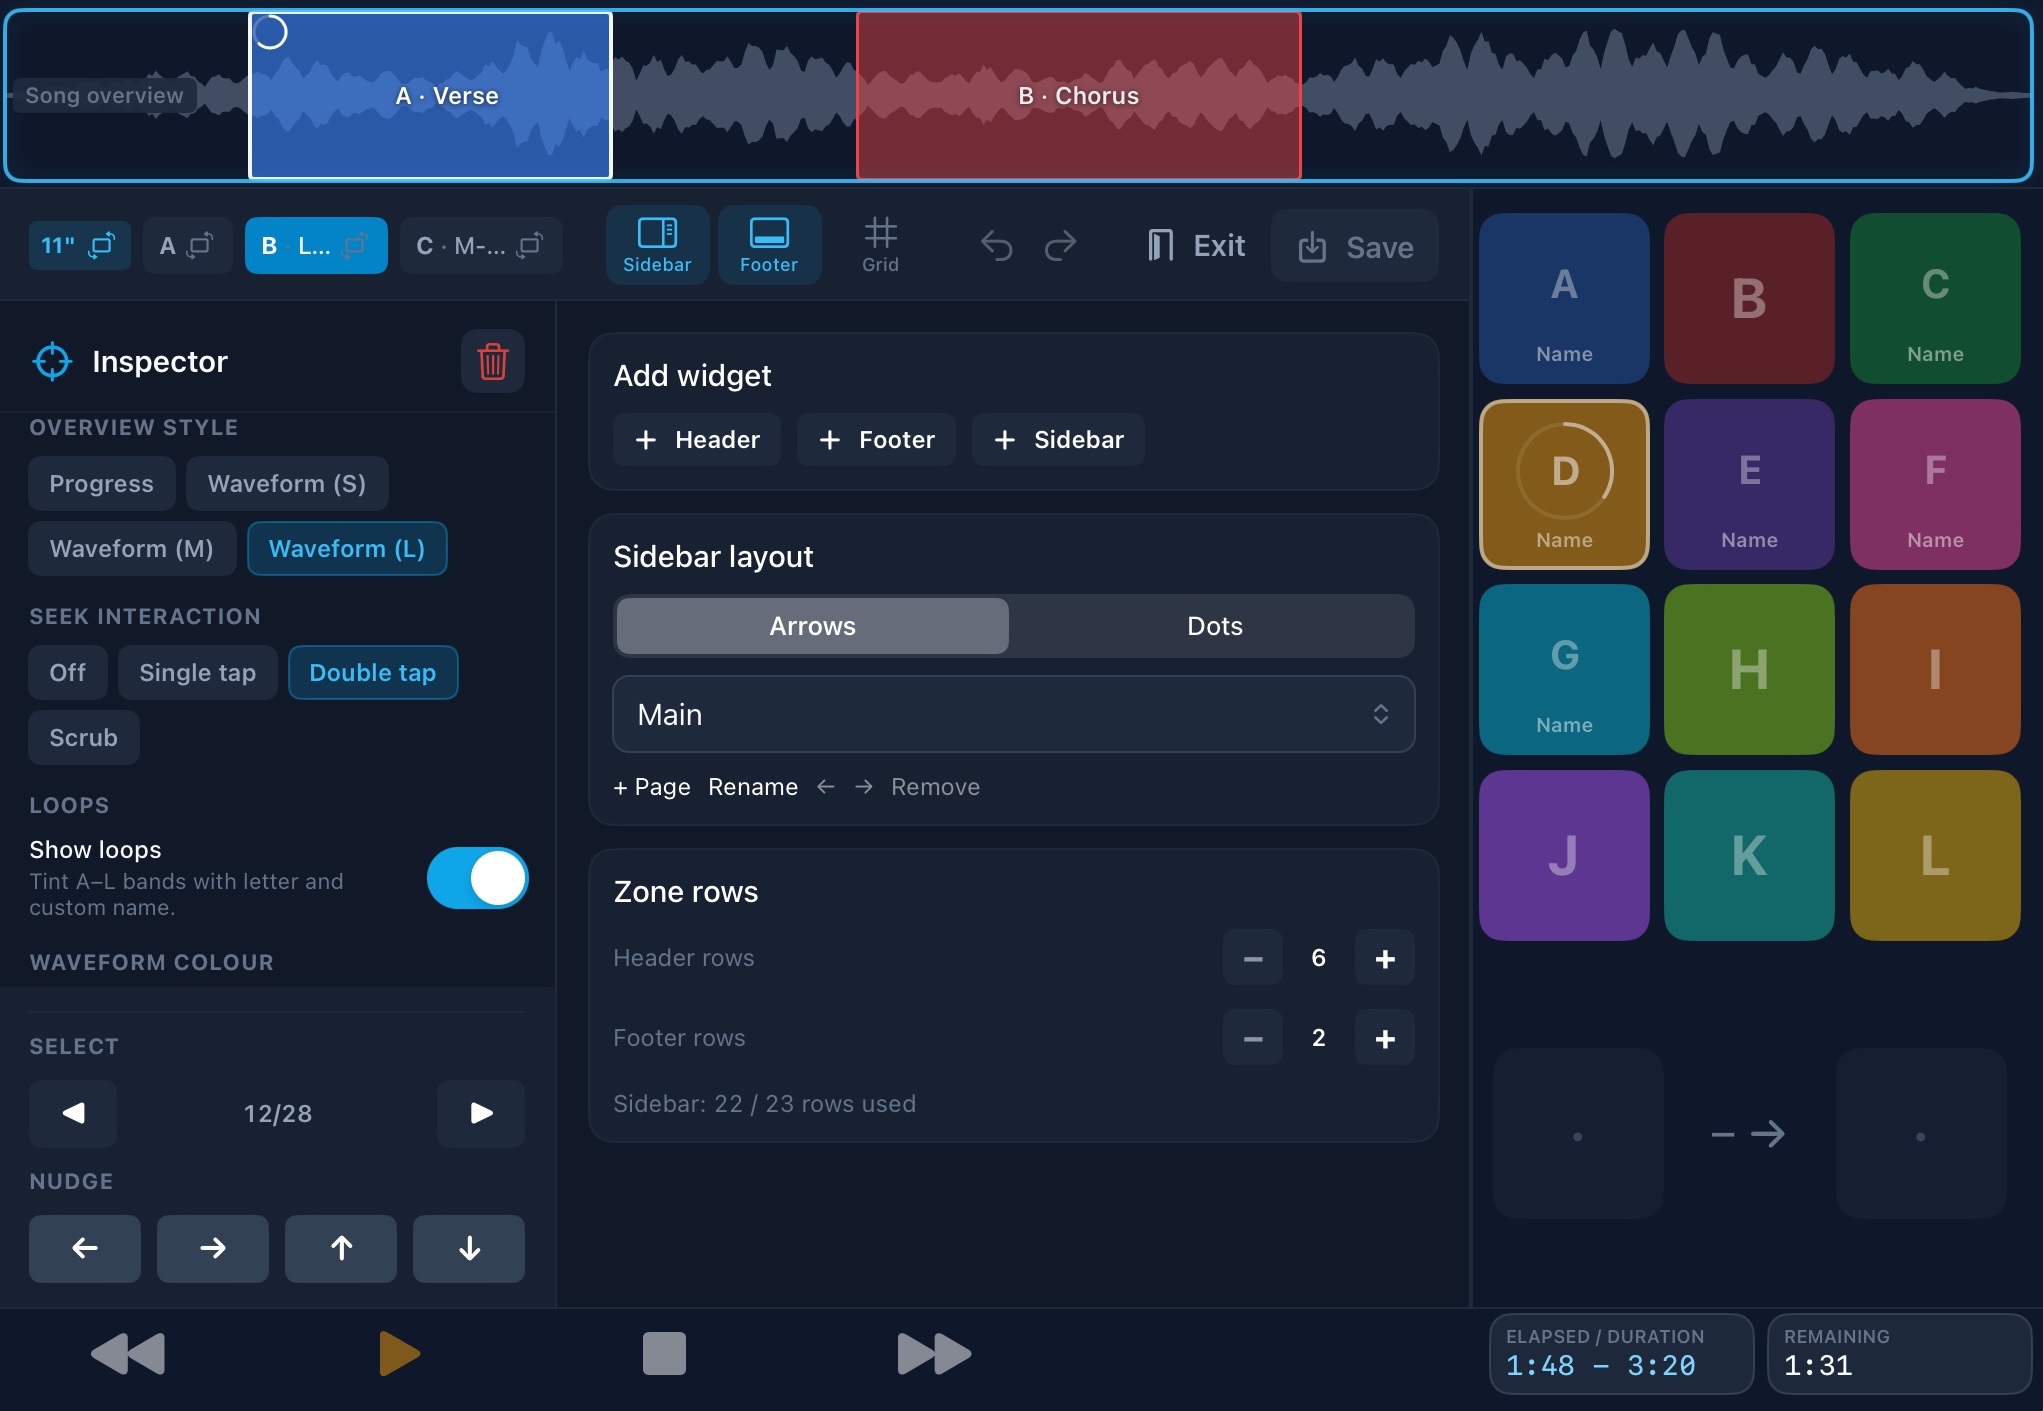
A compact system load strip sits in the center of the iPad status bar — between the clock/date and Wi‑Fi / battery. It is not a widget: it does not use a layout slot and does not change your dashboard grid.
What you see (updates about once per second):
- DSP — how full the audio render callback is (bar + %), relative to the current IO buffer
- CPU — process CPU %
- Memory — resident memory in MB
- Thermal — small colour dot for device thermal state
Colours move toward amber/red when DSP or CPU climbs (roughly from ~60% / ~85%). Use it while rehearsing dense multitrack songs, live pitch/tempo, or many FX — not as something you stare at mid-show.
Show or hide
Settings → Audio & mixer → Show system load in status bar (on by default). Turn it off for zero sampling cost — independent of Advanced → Performance logging.
Tip: If DSP stays high, try a larger IO buffer under the same Audio & mixer settings, lower Meter refresh, or bake a New Copy instead of live stretch. Low-tier iPads are happier at 2048–4096 sample buffers.
Layout presets & iPad sizes
BackTrackR ships six dashboard presets. You can rename any slot and customise the layout.
Layouts are saved separately per iPad size and rotation — landscape and portrait are independent. Rehearsing on 11" and performing on 13" (or rotating the iPad) keeps each configuration.
- A · Simple — compact show: chrome + overview
- B · Loops — loop pads A–L
- C · Numpad — numpad and related chrome
- D · Chart — thin header/footer so Charts Live has a large page
- E · User 1 / F · User 2 — starters to customise
Every stock layout includes the Charts widget. Open Settings → Layout → Open layout editor to arrange controls. Layout Share / Copy is widget JSON only — that is not the library Backup tab.
Appearance
Under Settings → General → Appearance pick Stage Dark (default) or Classic Slate. The look changes right away on the shell, lists and mixer — no restart.
Split View & small windows
If you shrink BackTrackR in Split View or Stage Manager until the window is too small for the show screen, a full-screen message asks you to make the window larger. The controls stay hidden until there is room.
Performing live
When showtime arrives, open your cue list and switch to performance mode.
- Select the cue list for tonight's gig.
- Enable Performance lock Lock to prevent accidental changes.
- Hit play on the first song.
- Open Charts Live if you are reading lyrics on this iPad.
- Use transport controls or auto-advance to move through the set.
- Watch NOW and NEXT indicators to stay oriented.
Fast song changes mean you can recover quickly from unexpected moments on stage — skipped songs, encores, or reordered sets.
Performance lock
Performance lock Lock prevents accidental edits during a live show — no bumped faders, no dragged widgets, no cue list changes mid-song. It also blocks shell Loop slot widgets, loop MIDI, foot-pedal Loop A–L, Next/Previous, and the chart editor (Live viewing still works).
Exception: Timeline A–L chips still arm while the Timeline drawer is open, so you can edit loops without unlocking the show.
Enable lock before the first song and disable it only when you are off stage or between sets. All other playback controls remain available while locked.
Best practice: Lock the show during soundcheck once levels are set, so nothing changes before doors open.
Background audio
Playback continues when BackTrackR is in the background — useful if you need to briefly switch apps during a performance (e.g. to a lighting app). For lyrics and chords on the same iPad, use Charts Live instead of leaving the app.
Audio does not stop when the screen locks, as long as playback was active before switching away.
Foot pedals
Control transport and loops with Bluetooth page-turn pedals — no vendor SDK required. Setup is sketch-based Bluetooth HID (keyboard) under Settings → Foot pedals.
Pair & enable
- Pair the pedal in iOS Settings → Bluetooth (there is no in-app connection picker).
- Open BackTrackR → Settings → Foot pedals.
- Turn Foot pedals on (footer toggle).
- Pick your Model (diagram).
Models in the picker
- AirTurn DUO / PED
- AirTurn BT500S-2 / BT500S-4 / BT500S-6
- AirTurn QUAD 500
- AirTurn 4-switch (QUAD)
- PageFlip Butterfly
- Other pedal (1–8 buttons — press each once to learn)
Pedal mode
Choose a mode that matches what your hardware sends. Not every model offers every mode — the menu only lists what that model can send.
- Up/Down Arrow Mode — most AirTurn keyboard modes and many page-turn pedals
- Left/Right Arrow Mode — PageFlip and some presentation profiles
- Page Up/Down Mode — PageFlip and document-style profiles
Example: AirTurn QUAD / QUAD 500 show Up/Down and Page Up/Down only (no Left/Right). Changing Mode rewires the key signals; your action choices stay the same.
AirTurn App Direct / AirDirect is not supported (proprietary protocol). Set the pedal to a keyboard arrow or page mode on the hardware. For a MIDI footswitch, use Other pedal learn below, or map Transport / Loops under Settings → MIDI & Timecode → Maps.
Map actions
- Tap a button on the diagram → choose an action, or
- Press the physical pedal while Settings is open — BackTrackR highlights the matching diagram button, then pick an action.
Quick setup → Apply fills suggested actions only (e.g. Cue prev/next, Play/Pause + Stop). Known models already wire HID keys when you pick model + mode — Apply is not required for wiring.
Available actions: Play, Pause, Stop, Play/Pause, Next, Previous, Loop A–L, or None. Next/Previous work on the cue list only. Loop A–L arms/disarms that slot (same as Timeline / MIDI Loops) and respects At end / Now. Next/Previous and Loop A–L are blocked under Performance lock.
Other pedal
- Set button count (1–8) under the top bar.
- Tap a diagram pad → press that pedal once → choose an action.
- Repeat for each button.
Other pedal can learn a keyboard press or a MIDI note / CC. That MIDI signal is shared with Maps and song triggers — if it is already used, BackTrackR asks before it replaces the old mapping. Latched pedals that send note-off or CC 0 still count as one press (the first press fires).
Known limits
- Foreground only: Bluetooth keyboard pedals work only while BackTrackR is in the foreground (iOS limitation).
- Pedal input is ignored while a text field overlay is open.
- While Settings is open, pedals highlight diagram buttons for mapping — they do not run transport/loop actions. Close Settings to use them live.
- Foot pedal settings are included when you Create backup.
Troubleshooting
- No response: paired in iOS Bluetooth? Foot pedals enabled? Pedal mode matches hardware? App in foreground? Text field closed?
- Double triggers: forget the device in iOS Bluetooth, factory-reset the pedal, re-pair.
- Keys ignored: turn off Accessibility → Keyboard → Full Keyboard Access.
- Wrong button fires: re-check Mode; for Other pedal, re-learn that pad.
MIDI overview
BackTrackR uses Core MIDI to trigger songs, control transport, arm loops, send optional messages when playback starts, and optionally send MIDI Clock or MTC. Timed patch/stomp cues live on the Timeline Control Track. Absolute show sync uses SMPTE / MTC / LTC.
All of this lives under Settings → MIDI & Timecode, with four tabs:
- Songs — chip MIDI (triggers / output / learn) or Timecode (starts, Follow/Off, auto-allocate, CueSync)
- Maps — Transport (Play / Pause / Stop / Next / Previous) and Loops A–L
- Sync — Send MIDI Clock, Send MTC, Chase, LTC input, fps, auto-regen
- Setup — destinations, Network/USB/virtual ports, Monitor log, note names
Compact In / Out lamps sit under the MIDI & Timecode title. You can also add MIDI in, MIDI out, and Timecode widgets via Settings → Layout.
Supported incoming messages: Note On/Off, Program Change, Control Change (CC), and system realtime Start, Stop and Continue. MMC SysEx Start/Stop/Continue is also recognised. Chase also accepts MTC and/or analog LTC on a hardware input.
Song triggers & output
Each song can have an Input mapping (incoming trigger) and an Output mapping (sent once when playback starts).
Input (incoming trigger)
- Power — turn the trigger on or off per song
- Ch / Type / Value — Note, Program Change, or CC (+ optional value; omit value to match any CC > 0)
- Learn — tap Learn, tap the Input row, then send MIDI from your controller or another app
- Clear — remove the input mapping
Trigger action
Choose what happens when the input message is received:
- Select — select the song and preload/stage it in the engine without starting playback (useful when another app picks the song first)
- Play now — load and play immediately (global default)
- Add to cue — append the song to the active cue list
Set a global default at the top of the Songs tab, or override per song.
Output (on play)
When a song starts, BackTrackR can send a configured Note, Program Change or CC to external gear. Use the Test (↑) button on each song card to send the output without starting playback. Output requires power on and a valid mapping.
Duplicate triggers: If two songs share the same Input binding, an amber warning appears. BackTrackR matches the first mapping in order — change or clear duplicates to avoid wrong songs firing.
Enable Settings → General → Song list metadata → Show MIDI trigger to see each song's mapped trigger in the library, setlist and cue list. You can also drag that column’s position under the same settings — see Song list metadata.
Transport control
On the Maps tab, map Play, Pause, Stop, Next and Previous independently to Note, Program Change, CC, or MIDI transport messages (Start 0xFA, Stop 0xFC, Continue 0xFB).
Play behaviour
- If a song is selected but not yet loaded, BackTrackR waits for staging then starts playback.
- If the selected song is already loaded, playback resumes from the staged position.
- Song triggers and transport run on separate tasks so a rapid Select + Play (e.g. from OnSong) does not cancel preload.
Pause only acts when already playing. Stop stops transport and re-stages the current library or cue selection.
OnSong Sync preset
Tap OnSong Sync preset on Maps → Transport to quickly map Play → Start (0xFA) and Stop → Stop (0xFC). This matches OnSong's Sync → Start workflow.
Stop burst filtering: When BackTrackR is in the background, two or more Stop messages within ~450 ms are ignored (e.g. from opening the app switcher). A single intentional Stop after that window still stops playback.
MIDI Loops
On Maps → Loops, map Note, Program Change or CC messages to Loop A–L. Incoming messages use the same arm/disarm path as Timeline chips and shell Loop slot widgets — including At end / Now and bar quant.
- Empty slots do nothing
- Blocked under Performance lock
- Slot letters are global: MIDI “Loop A” always targets slot A on the loaded song
See also Loops A–L and Loops on stage.
Timecode (SMPTE / MTC / LTC)
Absolute show sync for lighting, Resolume and similar — separate from MIDI Clock (tempo pulses). Globals live under Settings → MIDI & Timecode → Sync; per-song starts under Songs → Timecode (or Edit → Timecode).
Concepts
- LTC — analog SMPTE as a baked WAV stem (routed like other special tracks)
- MTC — MIDI Time Code sent live from the playhead
- Chase — incoming MTC and/or LTC selects a Follow song and seeks/plays
- Freewheel — default when chase lock is lost: keep playing (optional hard pause)
New Song, import & Follow starts
- Library → + Add → New Song creates a silent control bed (no WAV import) and places Follow start at the timeline tail (+60 s after the latest window) — ideal for Control / SMPTE-only songs.
- Imports without a readable SMPTE stem also get a tail start (same as New Song).
- Imports with SMPTE keep the decoded start when the slot is free; if another Follow song overlaps, choose New code (imported song → tail) or Move existing.
- Edit → New Copy always uses the tail (never the source song’s start).
- If a song grows past its Follow window, only that song relocates to the tail (Was/Now notice). Locked Song 0:00 blocks relocate.
Master (band → lights / video)
- Edit → Timecode: set song
0:00offset, frame rate, Follow/Off, optional Lock start. - Generate LTC → baked SMPTE stem → Save song.
- Settings → Special track routing: route SMPTE to the hardware out that feeds the desk.
- Optional: Sync → Send MTC.
- Play — LTC audio and MTC follow the locator.
If tempo or start offset changes, Edit shows SMPTE stem out of date → Regenerate. Optional idle auto-regen under Sync (skips locked / imported stems). Never auto-bakes while playing.
Chase (slave)
- Enable Sync → Chase incoming timecode.
- For analog LTC: pick Audio input device and LTC input channel (listen/tap only — not recording). Use the inline level meter to confirm lock.
- Songs with Timecode Follow match when absolute TC is inside their start→end window (or a cue TC in-point). Songs set to Off are skipped — chase ignores them and loops stay available on that song.
- Chase loads/seeks that song (works from stop). On the cue list it becomes NOW and preloads NEXT.
Use Auto-allocate on Songs → Timecode so Follow windows do not overlap (or rely on tail placement for new imports). Widget suffixes: LOCK / WAIT / NRDY / FREE.
Freewheel: brief TC drop clears the stale readout and keeps playing. Turn on Pause when timecode lock lost only if you want hard-slave behaviour. Pulling the whole USB interface rebuilds audio (brief gap) — pull only the LTC feed to test freewheel.
Song manager & CueSync
On Songs → Timecode: song list with start/end/fps/Follow/LTC status, Lock / Unlock all, scan imported stems, and Export CueSync… (metadata setlist JSON — no WAV).
Loops ↔ timecode
- Chase off — loops allowed on every song (even if still marked Follow)
- Chase on + song Follow — loop arm unavailable (edit regions still OK)
- Chase on + song Off — loops allowed; that song is not selected by chase
- Master (Send MTC / baked LTC) — loops allowed; wrap jumps absolute TC (lighting may rewind)
Prefer a linear song when other systems chase your absolute TC. See also Cue list and Loops A–L.
MIDI Clock
Optional tempo sync out to hardware FX / sequencers — not MTC and not Control Track cues.
- Settings → MIDI & Timecode → Sync → Send MIDI Clock (off by default).
- While playing, BackTrackR sends Start + 24 PPQN Clock at the song’s BPM, then Stop on pause/stop.
- Per song in Edit → MIDI Clock: Follow (default) or Off.
Requires a known song BPM. Destination is the same MIDI output path as other song output.
OnSong workflow
Want the lyrics and songs inside BackTrackR instead? Use Import from OnSong. This page is only about using both apps live over MIDI.
If another app on the same iPad sends song-change and Start/Stop over MIDI, map those messages so BackTrackR selects and plays the backing track.
Recommended mapping
- Per song — Input: map OnSong's song-change message (often a Program Change or Note per chart).
- Per song — Trigger action: Select (or set global default to Select).
- Transport — Play: map OnSong Sync → Start (system realtime Start 0xFA). Use the OnSong Sync preset.
- Transport — Stop: map Stop 0xFC for full stop from OnSong.
Typical sequence
OnSong: change song  →  MIDI In  →  BackTrackR Select  →  preload/stage
OnSong: Sync/Start   →  MIDI In  →  BackTrackR Play    →  load if needed, then play
Open OnSong before BackTrackR so its virtual MIDI ports appear under Setup → Connected app outputs. BackTrackR already listens to all MIDI sources except its own Out, so you usually do not need to select BackTrackR In manually.
When any song has an Input trigger or any Transport mapping exists, BackTrackR keeps the audio engine warm on the library tab to avoid cold-start errors when OnSong sends Play immediately after Select.
MIDI connections
Ports and destinations live under Settings → MIDI & Timecode → Setup. Tempo sync and absolute TC globals are on Sync — see MIDI Clock and Timecode.
Network (RTP)
- Toggle Enable Network MIDI for LAN connections (e.g. Mac on the same network).
- Send song output to: automatic (all network hosts) or one specific destination.
- First use may prompt for iOS Local Network permission.
USB
Class-compliant USB MIDI interfaces and controllers appear here. App virtual ports are not listed under USB — use Connected app outputs for those. Optionally pick a single USB destination for song output.
This iPad
- BackTrackR In — virtual destination (optional; app listens to all sources except BackTrackR Out)
- BackTrackR Out — virtual source other apps can receive from
- Connected app outputs — ports published by other apps (e.g. OnSong 2020, Session 1)
Note names & receiver alignment
Note names controls labels in the UI and monitor (stored note numbers never change):
- DAW / OnSong (C3 = middle C) — default; matches OnSong pickers
- Scientific (C4 = middle C)
Receiver monitor shifts sent note numbers only when your destination labels middle C as C3 (+12 semitones). Incoming labels and stored mappings are unaffected.
Background notifications
Under Settings → General, three optional toggles post iOS notifications while BackTrackR is in the background:
- Song selected and ready — after a MIDI Select trigger finishes staging
- Playing — when transport Play is received
- Stopped — when transport Stop is received
Monitor & troubleshooting
Under Setup, the Monitor log shows the last 120 MIDI messages with direction, endpoint, wire format and matched song or transport command. Enable Settings → Advanced → MIDI debug logging for detailed [MIDI] lines in Xcode when diagnosing timing issues.
Physical iPad required: Core MIDI input, learn mode and output testing do not work in the iOS Simulator.
Special track routing
Open Settings → Special track routing to match stem names across your whole library — once — instead of muting or re-routing the same tracks song by song in the mixer.
Turn on Automatic routing. Under Special tracks, edit Click / Cue stem / SMPTE and your customs. BackTrackR compares each track’s name (from Edit / the filename) to your match lists. Matched tracks get pan, optional mute, optional hardware output, and — if you want — a shared strip look.
Routing sits on top of each song’s mix. Turn a profile off and that song’s saved mix comes back — the mix file is not overwritten.
Closing Settings re-scans the library only when routing rules changed (progress overlay on large libraries). Re-scan library for conflicts always walks songs and names the song and tracks.
Built-in profiles
- Click — metronome for the drummer’s in-ears (default matches include klik, click, metronome, …)
- Cue stem — spoken count-ins or section cues
- SMPTE — timecode for lighting or video
Route click to IEMs while the audience hears only the backing through the house PA — no splitter workarounds. Built-ins default to Apply strip look on, so the mixer shows a clear KLIK / CUE / SMPTE channel.
Custom profiles
In the Special tracks list, tap Add custom (up to 32). Use these for regular music stems you want to control globally — not only click/cue/timecode.
Typical solo / duo / trio / band workflow:
- Name stems consistently across songs (e.g.
Kick,Snare,Bass,Keys,Gtr). - Add a custom profile per group (e.g. “Trio drums”) with those Match names in filenames (comma-separated aliases are fine).
- Leave Apply strip look off on mute groups so each track keeps its own name in the mixer (kick stays Kick, snare stays Snare).
- For tonight’s gig, turn Mute on for groups you are not using (e.g. mute drums + bass for a duo with keys only).
- Save — BackTrackR applies mute (or unmute) to matching tracks on every song. Flip Mute again when the lineup changes.
Why this helps: You keep a full multitrack library for every job, then switch Duo / Trio / Full band from Settings in seconds — without opening each song’s mixer. Mute is for setup before the show, not mid-song fader grabs.
Per-profile options
- Match names — comma-separated; exact name or a token inside a longer filename (e.g.
smpte 2-4→ SMPTE) - Apply strip look — when on, strip name / icon / colour override matched tracks (Click / Cue / SMPTE default on; customs default off for mute groups)
- Profile name — always available; becomes Name on track strip when Apply strip look is on
- Mute — library-wide mute on save; turn off to unmute those matches everywhere
- Pan — Left / Center / Right chips on matched tracks
- Output — Master (main mix) or a dedicated interface pair/channel when multichannel is available
Built-ins are checked first; then customs in list order — first match wins. At most two enabled customs may use hardware outs; extra customs stay on Master (mute-only customs need no reserved bus).
If something already uses an output you reserved for special tracks, use Re-scan library for conflicts and pick a new destination.
Audio interfaces
BackTrackR works with the iPad's built-in headphone output for rehearsal and small setups. For live rigs, a multichannel USB audio interface is recommended.
When to use an interface
- Separate outputs for click/IEM and house mix
- Balanced XLR outputs to a front-of-house mixer
- Lower latency for live performance
- Multiple monitor mixes for band members
- Analog LTC chase input (dedicated In channel)
Connect your interface via USB. Under Settings → Audio & mixer you can see the active device, set preferred sample rate (44.1 / 48 kHz), IO buffer size, Meter refresh (Auto / 30–120 Hz), and Show system load in status bar. Stem routing options appear when a multichannel device is detected.
Support tickets
Need help from us? Open Settings → Support (lifebuoy icon). You can create a ticket, follow the conversation under My tickets, and optionally attach a diagnostic debug log. The same inbox is available on the web at backtrackr.app/support.html.
Help & guides (book icon) is separate — that opens this manual and the video library. Support is for contacting BackTrackR with a case you can reply to.
Create a ticket
- Go to Settings → Support → Contact support (or the New ticket tab).
- Enter your name, email, optional subject, and a message describing the issue.
- Optionally add up to 3 files — photos (5 MB each) and one short video up to 50 MB (MP4, MOV or WebM). This works in the app and on the website.
- If you already recorded a debug log, turn on Include recorded log so it goes with this ticket.
- Tap Send ticket. You get a reference ID — follow the case under My tickets.
My tickets
Sign in with the same email you used on the ticket. We email a one-time 6-digit code (on the website you can also use a sign-in link).
- Open a case to read replies from BackTrackR Support and send your own reply (± photos or a short video).
- Status badges show where the case is: open, pending, resolved, or closed.
Debug log for support
When we ask for technical detail, record a short diagnostic log and attach it to the same case — it does not create a second ticket.
- Settings → Support → turn on Record debug log for support (off by default).
- Reproduce the problem in the app (or note that the log survives a relaunch after a crash).
- Open My tickets → select the case → tap Attach log (or Attach updated log if one is already on the case).
Tip: After a successful attach, capture turns off and the buffer is cleared. Use Clear recorded log if you want to discard a capture without sending. Song audio and lyrics are never included — see Privacy Policy for what diagnostic data may contain.
Troubleshooting
Still stuck after the tips below? Open a case under Support tickets or on backtrackr.app/support.html.
Song won't import
- Check that files are WAV format with one stem per file
- Ensure the bundle folder contains all stems for the song
- Verify you have enough free storage on your iPad
- Try importing from Files first to rule out cloud connectivity issues
- OnSong backup — use + Add → OnSong, not Audio folders. You get a review before anything is written. See Import from OnSong.
No audio output
- Check iPad volume and mute switch
- Verify no stems are muted in the mixer
- If using an interface, confirm it is connected and selected in audio settings
- Disconnect and reconnect USB if the interface is not detected
High DSP or CPU in the status bar
- Watch the DSP & CPU strip while playing — amber/red means the audio thread or process is busy
- Raise IO buffer or lower Meter refresh under Settings → Audio & mixer
- For live pitch/tempo on many stems, bake a New Copy for the gig
- Turn off Show system load in status bar if you do not need the readout (zero sampling cost)
Cloud import fails
- Sign out and sign back in to Dropbox, OneDrive or Google Drive
- Check your internet connection
- Ensure the file is fully synced in your cloud account before importing
Edit & tracks
- Added or replaced track not heard yet — Add+ and Replace stage files in a draft until you tap Save song. See Edit song & tracks.
- Deleted track still plays — swipe-delete only removes it from the draft until you tap Save song.
- Cannot delete a track — you cannot remove the last remaining stem in a song.
- Add+ is greyed out — the song is at the 64-track limit.
- Replace kept my mix — that is expected: Replace swaps the audio file but keeps the same track (faders, EQ, Timeline offset).
Timeline & loops
- Bars ruler / bar quant greyed — song needs a known BPM (filename, auto-detect, or typed in Edit). An empty field that only shows 120 does not count. See Tempo, key & filenames.
- Loop chip does nothing — empty slot; shell/MIDI/pedals under Performance lock; or Chase + Follow (Timeline A–L chips still arm while the drawer is open)
- Edits disappeared — drafts are cleared when you load another song; tap SAVE before switching songs
- Older iPad feels heavy — use Follow Page turn instead of Continuous modes
- See also Timeline overview and Loops A–L.
Charts
- Empty page in Live — this song has no chart yet. Open Edit → New chart, or import ChordPro / PDF in the editor. Mixed cue lists are normal.
- Follow does not move — place section markers on the Timeline Chart lane (Add or short-drag — a tap only parks the playhead) and SAVE. Manual scroll pauses follow — tap Follow again. Before the first marker the page stays on title and key.
- Cannot open the editor — turn off Performance lock.
- Chords look stretched or warped — rotate back and reopen Charts; Live relayouts on width change. Opening the song list should not change chart width.
- Tab / Guitar Pro failed — try
.gp5or.gpinstead of a GP6.gpx. There is no tab editor; Edit reopens the crop sheet. - Capo / diagrams missing after import — type the capo note in the lyrics if you need it on the page.
- Note missing in Live — empty notes stay hidden. Type something, then Save.
- No Lyrics | Score chip — that chip only appears when the song has both lyrics and a PDF.
- Live chords do not match the singer — use the Live tuningfork menu, or Settings → Charts → Follow pitch. Transpose in the editor rewrites the file (no audio).
- Double-tap does nothing — turn on Settings → Playback → Double-tap plays song, or hold the row → Play.
- See Charts overview.
MIDI issues
- No MIDI in Monitor — test on a physical iPad (Simulator disables MIDI input). Is the source app open? Check Setup for listed ports.
- Wrong song plays — check for duplicate Input mappings (amber warning on song cards). Monitor log shows which song matched.
- Select then Play loads wrong song — enable MIDI debug logging; confirm Select finishes staging before Play arrives.
- Play fails on first trigger — ensure at least one Input or Transport mapping exists so the audio engine stays warm.
- Output not received — Output power on? Check Setup routing and Receiver monitor octave alignment.
- OnSong not listed — open OnSong first, then refresh BackTrackR Setup.
- MIDI Clock silent — Send MIDI Clock on? Song BPM known? Edit → MIDI Clock not Off?
- See also MIDI connections and OnSong workflow.
Timecode & Control Track
- Loops greyed / unavailable — Chase is on and the song Timecode is Follow. See Timecode.
- Chase picks the wrong song — overlapping Follow windows; run Auto-allocate or set cue TC in-points.
- LTC meter silent — correct Audio input device / In channel? Mic permission? Engine running?
- Control cues missing after reopen — Timeline SAVE before switching songs.
- See Control Track.
Special track routing
- Custom mute did nothing — match names must appear in the track name (Edit / filename). Customs apply after Click / Cue / SMPTE; first matching custom wins.
- Still muting every song after the gig — turn off Mute on that custom (or disable the profile) and save so the library unmutes.
- All matched tracks renamed to one label — turn off Apply strip look on that custom so mute groups keep individual track names.
- See Special track routing.
FAQ
Is BackTrackR available on iPhone?
No — BackTrackR is designed for iPad only. The interface is built for live performance on a larger screen in portrait or landscape.
What audio format do I need?
Songs are imported as multitrack bundles with separate WAV files per stem.
Do I need an audio interface?
To get the most out of BackTrackR, use a USB audio interface with an adapter so you can charge the iPad at the same time — you don’t want to run out of power mid-show. You can also run without an interface, using the iPad’s stereo out: pan click one side and tracks the other; each side will be mono. Global mute for duo/trio lineups works without extra outputs via custom profiles.
Where is my music stored?
On your iPad. See our Privacy Policy for full details on data handling.
When will it be on the App Store?
BackTrackR is coming soon. The app page will be updated with a download link as soon as it is available. Until then you can join the TestFlight beta.
Can I change the look of the app?
Yes. Settings → General → Appearance: Stage Dark (default) or Classic Slate. It updates right away. See Layout presets & iPad sizes.
What is the Timeline?
A multi-track arrangement view for waveforms, Loops A–L, Control Track MIDI cues, Chart-lane section markers and stem alignment. See Timeline overview. It is separate from Edit (metadata, track list, Timecode/Clock, New Copy, charts). See Edit song & tracks.
Is there a looper?
Yes — up to 12 fixed loop slots A–L per song, with arm/disarm, At end / Now switching, and control from widgets, MIDI or foot pedals. Unavailable while chasing timecode with Follow. See Loops A–L.
Can BackTrackR send or chase SMPTE?
Yes — bake LTC, send MTC, and chase incoming MTC/LTC. See Timecode. Optional MIDI Clock is separate tempo sync.
What is Control Track?
Timed MIDI cues on the Timeline (Kemper / Helix / My templates, Live cue, Recall lists). See Control Track.
What is Charts?
Lyrics and chords that live in the song — a live page that can follow playback, plus an editor for text, Bars, Tab, notes and optional PDF. See Charts overview.
Is there a demo song?
Yes. Tap Download demo song on first launch, when the library is empty, or under Settings → Backup → Demo song. Demo Song 1 (~85 MB) is a full tutorial song with stems, mix, chart and timeline. See Demo song.
Can I import my OnSong library?
Yes. Library → + Add → OnSong, then pick a .backup, zip, or the OnSong Documents folder. You review lyrics, PDFs, linked audio, MIDI and setlists before anything is applied. See Import from OnSong. To keep using OnSong next to BackTrackR over MIDI, see OnSong workflow.
How do I mark a favorite song?
Hold the row → Favorite. A gold dog-ear appears. Sort → Favorites puts those songs first. See Favorites & tags.
How do I mute drums on every song for a duo gig?
Use Settings → Special track routing → Special tracks → Add custom: match the drum stem names, turn on Mute, leave Apply strip look off if you want each drum track to keep its own name, then save. That applies library-wide. See Special track routing.
How do I contact support?
Settings → Support → Contact support, or use backtrackr.app/support.html. Follow replies under My tickets. See Support tickets.